bikerbiker Aliwheels is a leading motorcycle parts supplier offering free shipping anywhere in the world on orders above $300. Please note that all of our motorcycle parts and accessories are certified and tested. With more than 10,000* products to choose from this is your one place to get the motorcycle part you need. Browse our vast inventory of motorcycle radiators, fairings, clutch plates, headlights, chains, and sprockets. biker

Free Shipping over $300

Support 24/7

Secure Payments

Hot Offers

Aliwheels is a leading motorcycle parts supplier offering free shipping anywhere in the world on orders above $300. Please note that all of our motorcycle parts and accessories are certified and tested. With more than 10,000* products to choose from this is your one place to get the motorcycle part you need. Browse our vast inventory of motorcycle radiators, fairings, clutch plates, headlights, chains, and sprockets.

Free Shipping over $300

Support 24/7

Secure Payments

Hot Offers

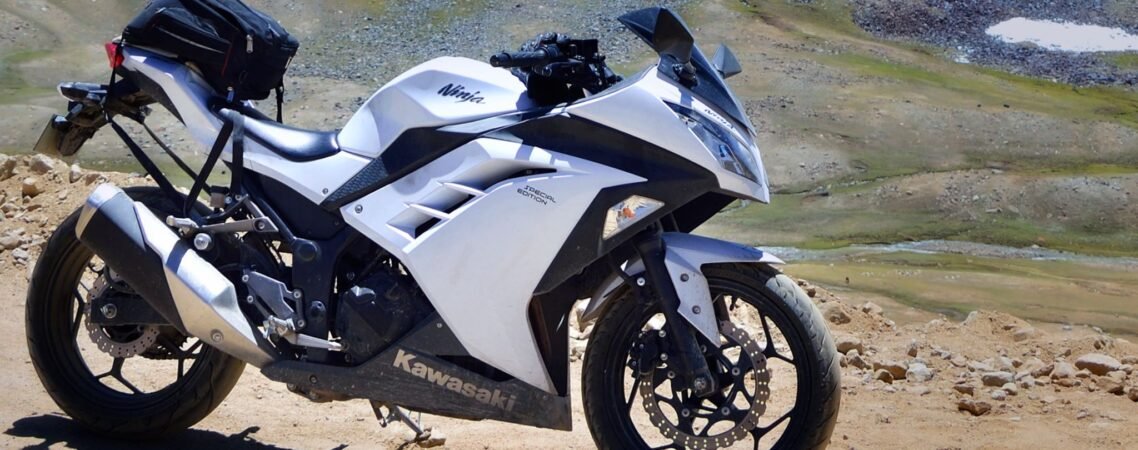
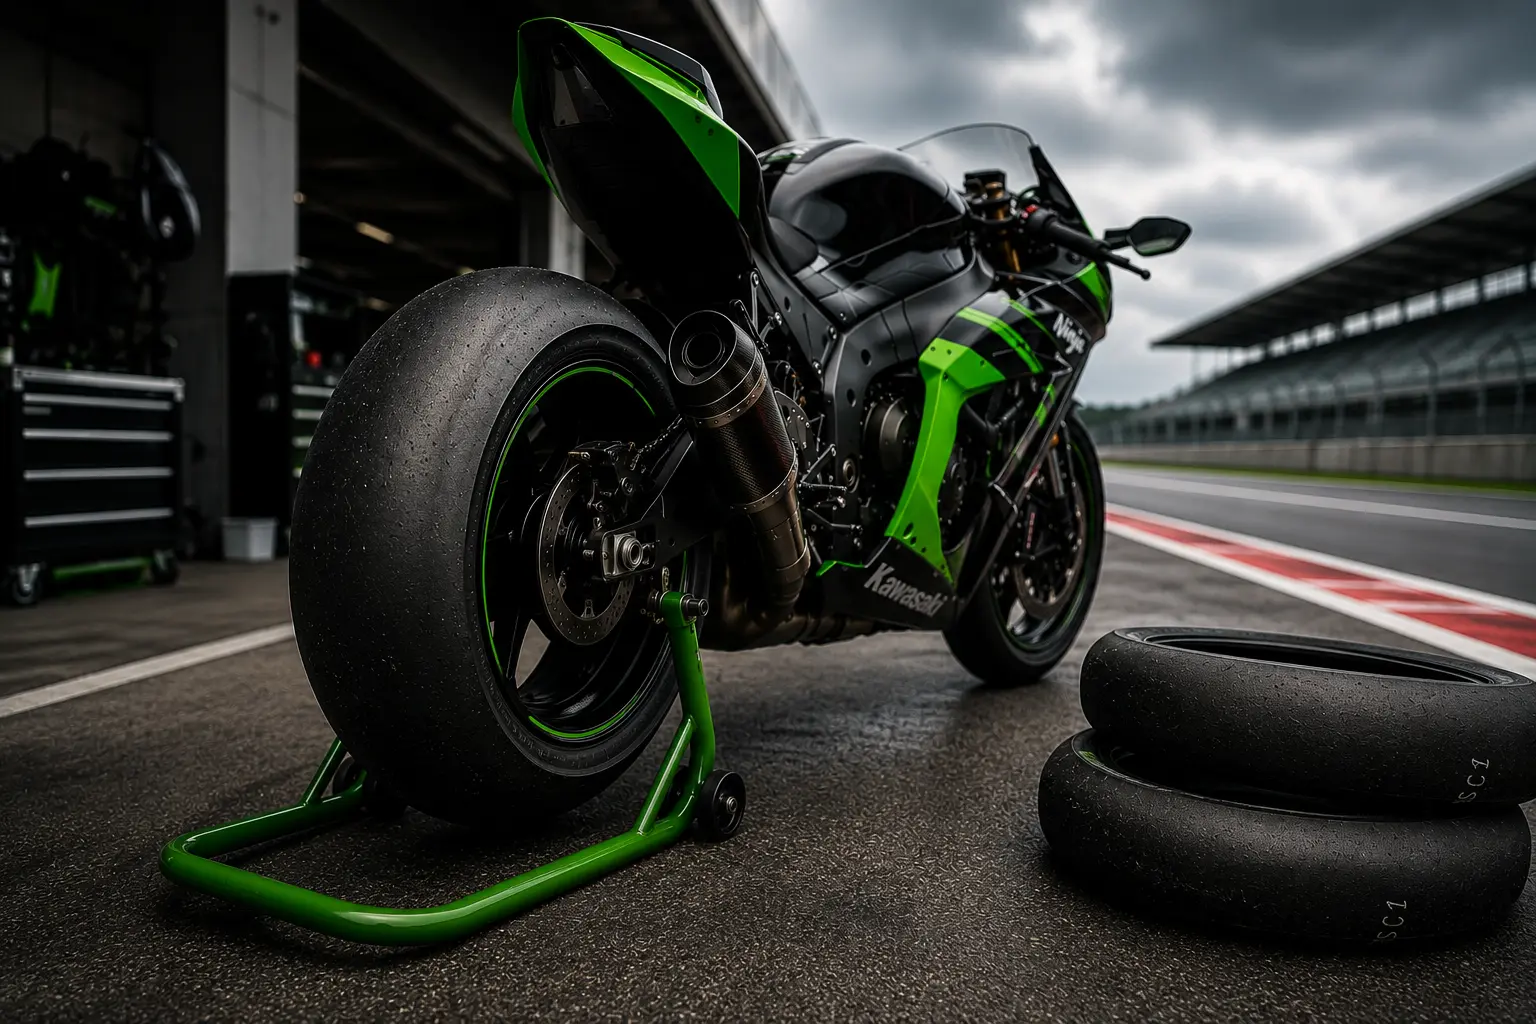
The Kawasaki Ninja range is engineered for optimum performance. The riding position reflects that. Bars are low relative to the seat. Weight goes forward. The aggressive crouch is part of what makes the Ninja feel alive.

But for riders who commute daily, cover long distances, or have any wrist, shoulder, or back sensitivity, that forward-biased position becomes genuinely fatiguing within an hour. And unlike seat or suspension issues, handlebar position affects every single minute of every ride, specifically, from the entry-level 500 through to the 650 and beyond 

A handlebar riser changes the geometry by raising the bar height and bringing the bars closer to the rider. The result is a more upright position, reduced weight on the wrists, and significantly less upper body fatigue on longer rides. It does not transform the Ninja into a cruiser. It makes it liveable for real-world riding distances.

Browse Aliwheels‘ Kawasaki Ninja handlebar risers in the Kawasaki Motorcycle Parts and Motorcycle Handlebars categories, and for the full range, browse Motorcycle Parts.

How Do Handlebar Risers Affect the Ninja’s Riding Position?

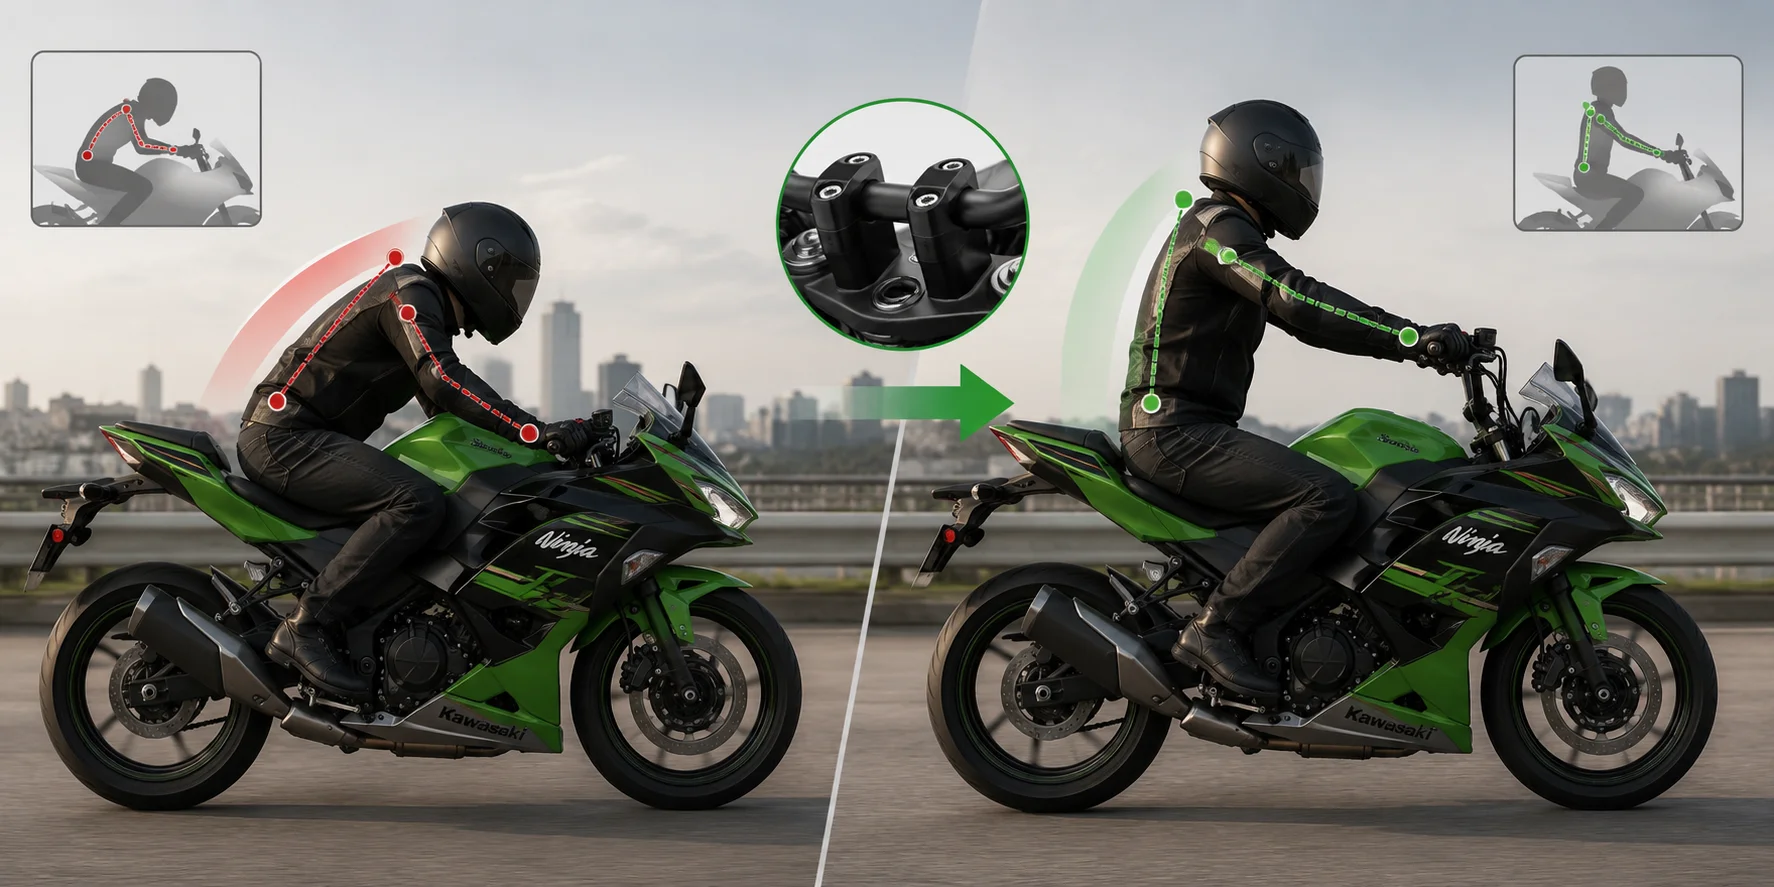
The standard Kawasaki Ninja handlebar position requires the rider to reach forward and down to reach the bars. This puts sustained tension in the wrists, forearms, shoulders, and upper back to support the upper body’s weight partially transferred through the arms.

A riser raises the clamp point where the bars mount to the top clamp. A 20 mm rise typically reduces forward lean by several degrees. Enough to transfer meaningful weight back to the seat and away from the wrists. Most Ninja riders report immediate wrist pressure reduction and reduced shoulder and upper back fatigue within the first ride after installation.

The secondary effect is on controlling weight. With less body weight supported through the arms, you ride the bars with your hands rather than leaning on them. Counter-steering inputs become lighter and more precise because your arms are not simultaneously holding up your upper body.

According to Kawasaki Ninja owner forums, including Ninja650.org and KawiForums, handlebar risers are among the top five most commonly recommended comfort modifications for any Ninja model used for commuting or longer-distance riding.

Kawasaki Ninja handlebar riser improving rider posture

Riser Height: How Much Rise Do You Actually Need?

This is the question most buyers get wrong because they assume more is always better. It is not.

Too little rise, 10 mm, provides minimal comfort improvement on a bike with a genuinely aggressive stock position. Most riders feel little difference.

The sweet spot for most Ninja riders is 20 to 30mm of rise. This meaningfully reduces forward lean and wrist pressure without significantly altering the bike’s handling character or creating awkward bar-to-body proportions.

Too much rise, 40 mm or more, can move the bars past the point where the OEM cables, brake lines, and wiring have sufficient length to accommodate the changed geometry. Over-length brake cables that become slack reduce braking feel. Tight cables that pull at full lock create dangerous steering resistance.

Before finalizing riser height, check your existing cable and brake line lengths with the risers fitted but not permanently secured. Turn the bars to full lock in both directions. All cables, brake lines, and wiring must have enough slack to complete full lock travel without tension. If they do not, extended cables or brake lines must be sourced at the same time as the risers.

Clamp Diameter: Getting This Right

Kawasaki Ninja handlebars use a standard 22mm (7/8 inch) bar diameter across the Ninja 250, 300, 400, 500, and 650 models. Risers must match this diameter exactly at the clamp point.

Some risers are designed for the 28.6mm (1-1/8 inch) diameter used on larger naked bikes and ADV machines. These will not clamp correctly on Ninja bars. Confirm the clamp diameter specification before ordering any riser.

Installation: What the Job Requires

Installing handlebar risers on the Kawasaki Ninja range is an intermediate DIY task. You do not need specialist tools beyond a metric socket set and a torque wrench.

Remove the original top clamp bolts that secure the handlebar to the top triple clamp. Most Ninjas use two bolts per side.

If the riser replaces the OEM bar clamp, install the riser in place of the clamp. If it is a riser that fits over the existing clamp, position it correctly before reinstalling the bar.

Loosely refit the handlebar to allow position adjustment.

Sit on the bike in your riding position and adjust bar height and sweep angle before final torquing. Small adjustments in bar angle make significant differences in wrist angle at the grip.

Check full lock in both directions for cable and line clearance as described above.

Torque all fasteners to specification using thread locker on the riser-mounting bolts. Typical Ninja handlebar clamp torque is 20 to 25 Nm; check your service manual for the exact figure.

Step 7: Road-test at low speed before any highway riding to confirm that the bar position feels correct and that the steering is unaffected.

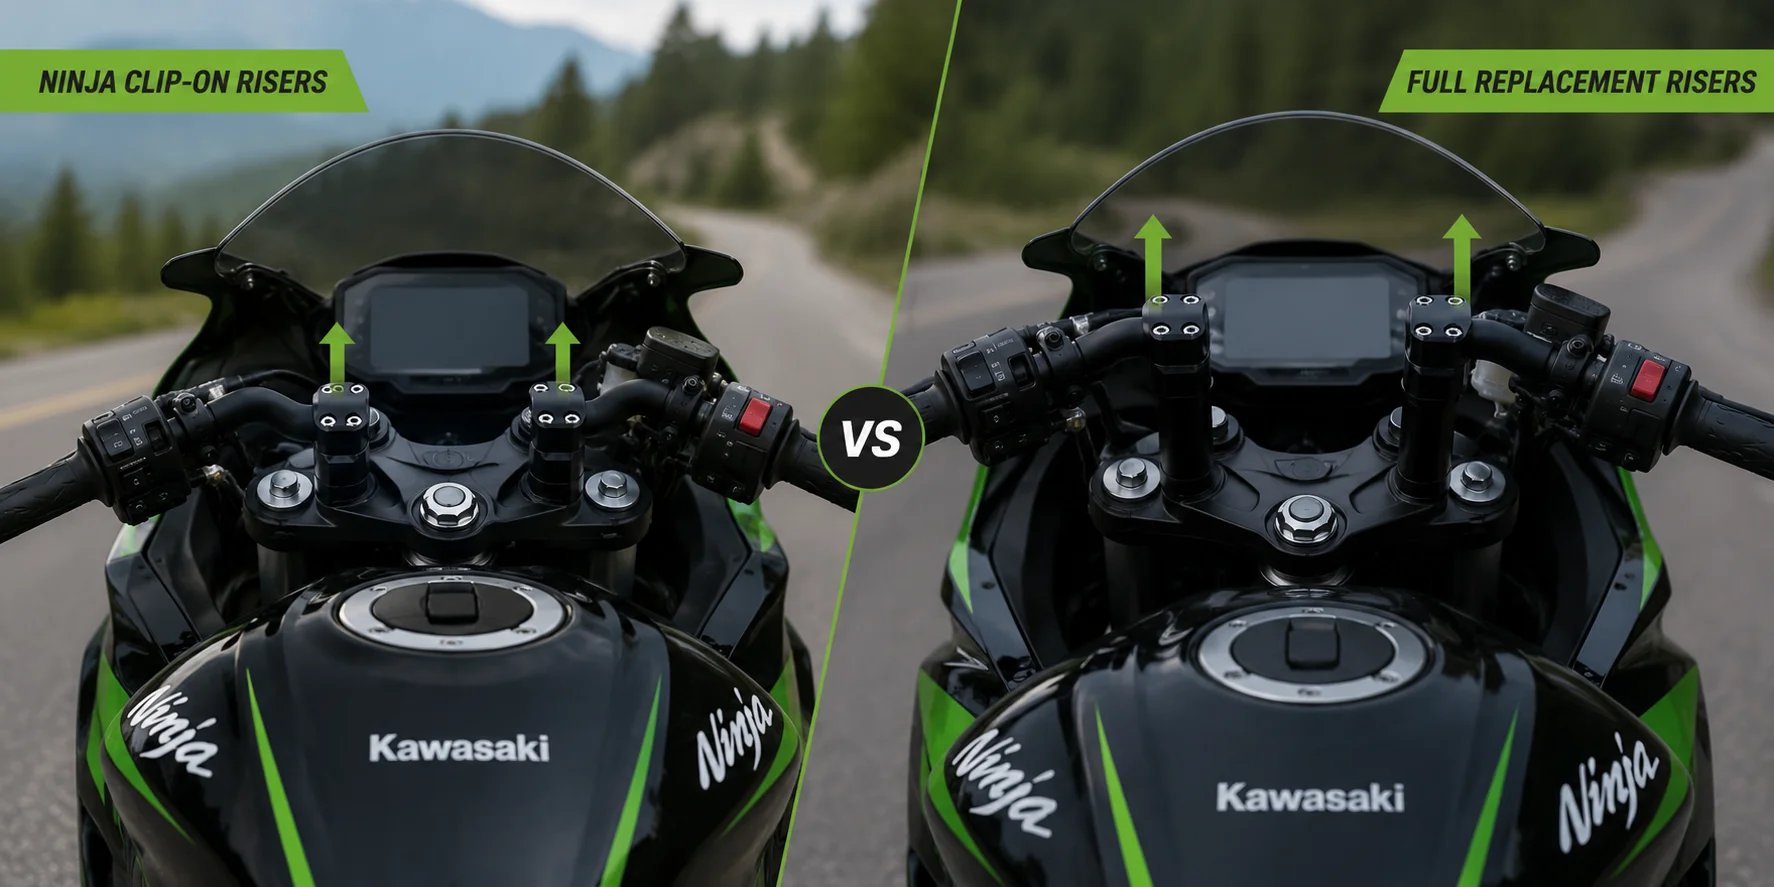
What About Clip-On Risers vs. Full Replacement Risers?

Clip-on risers that attach to the existing top clamp provide the simplest installation path. They add height without requiring disassembly of the upper triple clamp area. The trade-off is that their load capacity is lower than a full replacement riser, and some designs have more flex under hard braking loads.

Full replacement risers replace the OEM handlebar clamp entirely with a unit incorporating the rise. These are stronger and more precise but require slightly more involved installation.

For comfort-oriented Ninja riders doing predominantly street and touring riding, clip-on risers in the 20-30mm range are the practical choice. For riders who push the bike hard or track day regularly, a quality full replacement riser with an appropriate clamp design is the better investment.

Related reading: How to Stop Vibrations in Motorcycle Handlebars with the Right Grips on the Aliwheels blog.

Ninja clip-on risers vs full replacement risers comparison

Conclusion

A Kawasaki Ninja handlebar riser is one of the most effective and reversible ergonomic upgrades available for any Ninja model. The improvement in wrist and upper body fatigue is immediate and significant for riders doing more than 30 minutes per ride. The key decisions are correct rise height for your body proportions and riding style, correct 22mm clamp diameter for Ninja models, and cable clearance verification before finalizing installation.

Get those three things right, and the Ninja transforms from a bike you ride in spite of its position to one you ride comfortably because of it.

Frequently Asked Questions

Q: Will a handlebar riser change how my Kawasaki Ninja handles?

A: A moderate rise of 20 to 30mm produces minimal change in the Ninja’s handling character. The steering geometry is unchanged — only the rider’s position relative to the bars shifts slightly. Riders transitioning from aggressive track positions to road comfort sometimes report that the more upright position makes them feel slightly less connected to the front end initially, but this adapts quickly within the first few rides.

Q: Do I need to replace the cables after fitting Kawasaki Ninja handlebar risers?

A: It depends on the riser height and your specific model year. At a 20mm rise, most Ninja models have enough cable and brake line length to handle the change without modifications. Moving up to a 30mm rise may require an extended front brake line on some models. For rises of 40mm or more, cable and brake line extensions are usually necessary. Always check clearance at full lock in both directions before finalizing the installation.

Q: Can I install handlebar risers on a Kawasaki Ninja as a beginner mechanic?

A: Yes. This is a beginner to intermediate task requiring only basic tools and careful attention to the torque specifications and cable clearance check. The most common beginner mistake is forgetting to check full lock cable clearance after installation. Take your time on this step, as it is the one that matters most for safety.

Q: Will handlebar risers void the Kawasaki Ninja warranty?

A: In the US, the Magnuson-Moss Warranty Act prevents manufacturers from voiding a warranty solely because an aftermarket part was installed, unless the manufacturer can demonstrate the aftermarket part caused the specific failure being claimed. A handlebar riser that is correctly installed and does not damage any covered component does not void your powertrain warranty.

Q: What is the correct torque for Kawasaki Ninja handlebar clamp bolts?

A: Torque specifications vary slightly by Ninja model year. The Ninja 650 service manual specifies 20 Nm for handlebar holder upper bolts. The Ninja 400 and 500 specifications are similar. Always use your specific model year’s service manual as the definitive torque reference rather than generic specifications.

(Commenting: OFF)

Kawasaki is known for tough builds and capable motorcycles. The Ninja series, the Z lineup, the Versys adventure bikes, and the brutally powerful H2 all share a reputation for performance and durability.

But durability is not a maintenance alternative. Even the most well-designed motorcycle degrades without proper care. Riders who maintain their Kawasakis get exceptional durability. Those who do not maintain experience preventable failures.

Here is a practical, experience-based guide on how to maintain your Kawasaki for the long run.

Know Your Specific Model’s Requirements

Kawasaki’s lineup spans everything from 125cc learner bikes to turbocharged superbikes. Each motorcycle has specific maintenance requirements, service intervals, and known wear areas.

A Ninja 400 has very different service demands from a Z900 or a Versys 1000. The engine architecture, cooling system, lubrication volumes, and component specifications all differ.

Start with the service manual for your specific model and year. Kawasaki service manuals are detailed and accurate. Every torque specification, fluid type, service interval, and procedure is documented. Generic advice from forums is useful context. The service manual is the actual authority.

If you do not have your manual, Kawasaki dealer parts departments can supply it. Digital versions are also available for most models.

Engine Oil is the foundation of everything

Kawasaki engines are engineered to tight tolerances. They need clean oil of the correct specification to function as designed.

Kawasaki recommends 10W-40 or 10W-30 mineral or synthetic oil, depending on the model and climate. Higher-performance engines in the Z series and Ninja range often benefit from full synthetic oil. Check your manual for the correct specifications.

Service intervals for most Kawasaki street bikes are 6,000 km or six months under normal conditions. For high-performance models like the Ninja ZX-10R or H2, shorter intervals of 3,000 to 4,000 km under hard use are more appropriate.

Change the oil filter with every oil change. This is non-negotiable. A filter holding contaminated oil from the previous service compromises the fresh oil immediately.

When draining, allow full drain time. Three to five minutes minimum. A hurried drain leaves a significant volume of contaminated oil in the engine.

Inspect the drain plug magnet when changing oil. Some Kawasaki engines use a magnetic drain plug that captures ferrous wear particles. Minimal fine residue is normal. Any fragments larger than fine powder warrant closer investigation.

Cooling System Maintenance on Liquid-Cooled Models

Most modern Kawasaki street bikes are liquid-cooled. The cooling system is often maintained poorly or ignored until it fails.

Coolant degrades over time. The corrosion inhibitors that protect aluminum components in the engine and radiator deplete with use and age. Old coolant with depleted inhibitors allows electrochemical corrosion inside the cooling passages.

Kawasaki recommends coolant replacement every two years regardless of appearance. Coolant can look normal while its protective properties are exhausted.

Use only Kawasaki-recommended coolant or a compatible premixed coolant that meets the specifications for aluminum engine cooling systems. Never use automotive coolant unless it specifically states compatibility with aluminum engines and motorcycle cooling systems.

Inspect the coolant hoses annually. Look for surface cracking, hardening, or soft spots that indicate internal degradation. Hoses that feel stiff or show surface cracks are close to failure. A coolant hose failure during a ride causes rapid engine overheating.

Check the radiator fins for debris blockage. Road insects, leaf debris, and road grime accumulate between the fins and reduce cooling efficiency. Clean carefully with low-pressure water or compressed air directed from behind the radiator.

Chain Drive Maintenance

Most Kawasaki motorcycles use chain final drive. The chain system requires more attention than any other drivetrain component on your bike.

Clean and lubricate the chain every 500 to 800 km under normal conditions. After rain, immediately. After every wash.

Check chain tension every 1,000 km. The correct slack specification is in your service manual and varies by model. Incorrect tension accelerates wear on the chain, sprockets, and rear wheel bearing.

Inspect the sprocket teeth during chain checks. Worn teeth have a hooked or pointed profile rather than the correct symmetric shape. Worn sprockets must be replaced with the chain, never separately.

Replace the chain when it reaches the wear limit measured by the 20-link method. For 520-pitch chains used on most Kawasaki middleweights, this is approximately 323mm across 20 links. For 525 or 530 chains on larger models, check the specific limit.

Replace the chain and both sprockets together every time. Installing a new chain on worn sprockets produces rapid wear and skipping from the first kilometer.

Chain Drive Maintenance


Brake System Service

Kawasaki brakes across the lineup are excellent. Radial-mount calipers on performance models, linked braking systems on some adventure models, and standard sliding caliper setups on entry-level bikes all require regular maintenance.

Replace brake fluid every two years. Brake fluid absorbs moisture from the atmosphere over time. Contaminated fluid has a lower boiling point. Under hard braking, contaminated fluid can vaporize and cause brake fade.

Check brake pad thickness every 5,000 km. The minimum thickness before replacement is 1mm on most Kawasaki calipers, but replace at 2mm to maintain consistent performance. Never allow pads to wear to the metal backing plate.

Inspect brake rotors for scoring, deep grooves, and minimum thickness. Each rotor has the minimum thickness stamped on it or listed in the service manual. A rotor below minimum spec must be replaced. A thin rotor flexes, warps, and loses heat dissipation capacity.

If your Kawasaki is equipped with ABS, have the system tested if the ABS warning light illuminates or the system behaves unexpectedly. ABS sensor wheels can accumulate debris. ABS pump seals can develop leaks over time. These are not DIY repairs but they require prompt attention.


Air Filtration

Replace the air filter every 15,000 km under normal conditions. In dusty environments, inspect every 5,000 km.

A clogged air filter restricts airflow and forces the engine to run rich. On fuel-injected Kawasakis, this throws the fuel mapping off. Throttle response dulls. Fuel consumption increases. Power drops noticeably in the mid-range.

The air filter on most Kawasaki models is accessible without major disassembly. It is one of the quickest and most cost-effective service items you can perform.

Check the airbox seal where it mates with the filter element. A damaged seal allows unfiltered air to bypass the element. The engine breathes unfiltered air while the filter reads as clean.


Valve Clearance Checks

This is the maintenance item most commonly skipped by Kawasaki owners who service their own bikes.

Modern Kawasaki four-stroke engines use shim-over-bucket valve actuation on performance models or rocker arm systems on lower-displacement models. Both require periodic valve clearance inspection.

Out-of-specification valve clearance causes multiple problems. Tight valves on the exhaust side can burn valve seats over time. Loose valves cause excessive noise and reduce efficiency.

Kawasaki specifies valve clearance checks every 15,000 to 25,000 km depending on the model. Check your manual for the specific interval.

This job requires removing the fuel tank and valve cover at minimum. It is within the capability of a competent home mechanic with the correct tools. If clearances are out of specification, adjusting shim-type valves requires removing the camshafts to access the shims.

Skipping this service does not save time. It creates expensive repair work later.


Electrical System Health

Kawasaki’s electrical systems on modern models are robust. Regular attention prevents the intermittent faults that are difficult and time-consuming to diagnose.

Inspect battery terminals annually. Clean any oxidation with a wire brush and apply terminal protector spray. A corroded terminal creates resistance that affects starting performance and charging system behavior.

Check the charging voltage with a multimeter at 3,000 to 4,000 RPM. Correct output is 13.5 to 14.8V at the battery terminals. Below this range indicates a charging system fault. Above 15V indicates a failed regulator-rectifier.

Kawasaki regulator-rectifier units on some older models have a history of heat-related failure. If your bike is an older Kawasaki that has not had the regulator replaced, check its condition and mounting. Ensure it is securely mounted to a metal surface for heat dissipation.

Inspect wiring harness routing annually. Look for chafing against frame edges or heat damage near exhaust components. Replace any wiring showing damaged insulation before it causes shorts.

Electrical System Health


Fork and Suspension Service

Front forks need periodic oil changes. Over time, fork oil loses viscosity and its damping properties degrade. The bike starts feeling vague over bumps and the suspension sits lower in its travel.

Kawasaki recommends fork oil changes every 20,000 to 30,000 km on most models. If you have never had this done on a high-mileage bike, schedule it.

Inspect fork seals whenever you clean the front wheel area. A leaking fork seal leaves a visible oil film on the fork leg below the seal. Replace leaking seals promptly. Fork oil on the front brake rotor is a serious safety issue.

Rear shock linkage bearings require greasing or replacement on high-mileage bikes. Neglected bearings corrode and seize. A seized linkage prevents the suspension from moving through its full travel and creates dangerous handling characteristics.


Sourcing the Right Parts

The quality of parts you use directly affects how long your maintenance efforts last.

Incorrect specifications, inferior materials, and poor manufacturing tolerances all create problems that show up during the next service cycle or sooner.

Quality Kawasaki motorcycle parts sourced from a reliable supplier provide accurate fitment, correct specifications, and consistent performance over their service life.

Verify part compatibility with your specific model year before ordering. Kawasaki updates part numbers and specifications across model years even on visually similar components. Using the correct part for your specific year matters.


Build and Follow a Service Schedule

The single most impactful habit a Kawasaki owner can develop is a written service schedule.

List every service item from your manual with its interval. Record each service with the date and odometer reading when completed. Review upcoming services before each riding season and budget for them accordingly.

Predictive maintenance is always cheaper than reactive repair. A Kawasaki that is maintained consistently and correctly will cover enormous distances without unexpected failures.

The bike rewards the effort. Keep up your end of the relationship.Find quality Kawasaki motorcycle parts for every service interval at AliWheels.

(Commenting: OFF)

The Kawasaki Ninja has earned a reputation for being one of the most approachable yet capable sportbike platforms ever built. From the Ninja 400 to the ZX-6R and ZX-10R, these bikes dominate track days, club racing grids, and rider search queries alike. Terms like Kawasaki Ninja track upgrades, best track parts for Ninja, and Kawasaki Ninja track setup continue to trend because riders quickly realize something important. Stock Ninjas are fast, but they are not track-optimized.

What separates a confident, predictable track bike from a nervous, inconsistent one is not horsepower. It is the parts that control feedback, stability, braking, and rider connection. Understanding which Kawasaki Ninja track parts matter most saves money, improves lap times, and prevents the most common beginner mistake: upgrading the wrong things first.

Why Stock Ninja Parts Hit Their Limits on Track?

Kawasaki builds Ninja models to strike a balance between performance, comfort, reliability, and cost. On the street, this balance works well. On track, the limits show up quickly.

Riders searching for Kawasaki Ninja track day problems often describe the same sensations. Excessive fork dive under braking, vague front-end feel mid-corner, rear instability on corner exit, and brakes that fade after a few hard laps. None of these issues means the bike is bad. They mean the bike has reached the edge of its stock design envelope.

Track riding amplifies weaknesses that casual riding never reveals.

Suspension: The Single Most Important Upgrade

Among all Kawasaki Ninja track upgrades, suspension consistently delivers the biggest improvement per dollar. Kawasaki Ninja suspension upgrade’ and ‘Ninja fork upgrade dominate track-focused forums.

Stock suspension is soft and under-damped to remain forgiving on the street. On track, that softness translates to instability. Upgrading fork internals, springs matched to rider weight, and a quality rear shock transform the bike.

Proper suspension improves braking stability, mid-corner confidence, and tire contact. Riders often report faster lap times without touching the engine simply because the bike finally does what their inputs ask.

Tires: The Foundation of Track Performance

No list of Kawasaki Ninja track parts that matter most is complete without tires. High-intent searches like best track tires for Kawasaki Ninja and Ninja track tire pressure exist because tires define everything else.

Street tires overheat, lose grip, and send inconsistent feedback when pushed. Track-focused tires provide predictable grip, quicker warm-up, and clearer communication at the limit.

Many riders mistakenly upgrade power before tires. Experienced track riders do the opposite. Grip always comes first.

Tires The Foundation of Track Performance

Brake Components That Actually Change Performance

Braking upgrades are another area where Ninja owners see immediate results. Searches such as Kawasaki Ninja brake upgrade track and Ninja brake fade track day reveal common pain points.

The most impactful changes are not flashy. Steel braided brake lines reduce lever sponginess. High-temperature brake fluid prevents fade. Track-oriented brake pads improve initial bite and consistency.

Caliper swaps and oversized rotors matter far less than proper fluid, lines, and pads. Riders who prioritize braking confidence often find their corner entry improves more than expected.

Rearsets and Rider Control

As speeds increase, rider ergonomics become a performance factor. Queries like Kawasaki Ninja rearsets track and Ninja track ergonomics reflect how riders struggle with stock foot positioning.

Adjustable rearsets provide higher ground clearance and allow riders to position their feet for better body control. This directly affects cornering confidence and lean angle.

On track, rider input must be precise. Rearsets improve that connection without altering the bike’s mechanical behavior.

Steering Dampers and Stability at Speed

For higher-powered Ninja models, especially the ZX-6R and ZX-10R, stability becomes critical. Searches for Kawasaki Ninja steering damper track often spike after riders experience headshakes on corner exit.

A quality steering damper does not mask poor setup, but it adds a margin of safety when conditions get aggressive. It is especially valuable for riders transitioning from intermediate to advanced pace.

Cooling and Heat Management

Track riding stresses cooling systems far more than street riding. Terms like Kawasaki Ninja overheating track and Ninja track cooling upgrade highlight this reality.

Upgraded radiator hoses, race-spec coolant, and improved airflow help maintain consistent engine temperatures. Heat management preserves power delivery and protects engine longevity during extended sessions.

While not glamorous, cooling upgrades matter more the harder you ride.

Gearing Changes for Track Use

Many Ninja owners search for Kawasaki Ninja track gearing once they realize stock gearing favors street use. Adjusting sprocket ratios improves acceleration and allows better gear selection for specific circuits.

This upgrade does not increase horsepower, but it makes existing power more usable. Riders often find themselves smoother and more confident simply because the bike stays in its optimal power band.

Engine Mods: Lower Priority Than Most Expect

One of the most surprising insights for new track riders is how little engine mods matter early on. Searches like Kawasaki Ninja engine mods track exist, but experienced riders often delay them.

Exhausts, tuning, and intake mods offer marginal gains compared to suspension, tires, and brakes. Until a rider consistently reaches the bike’s limits, engine upgrades rarely translate to faster laps.

Track performance is about control, not top speed.

Safety and Protection Parts That Save Money

Crash protection rarely feels exciting until it becomes essential. High-intent searches, such as Kawasaki Ninja track crash protection, show how often riders learn this lesson the hard way.

Frame sliders, case covers, and axle protectors reduce damage during low-speed spills. These parts do not improve lap times, but they protect your ability to keep riding.

Track riding carries risk. Smart riders plan for it.

Safety and Protection Parts That Save Money

What Experienced Ninja Track Riders Prioritize?

Patterns across track communities are consistent. Riders who focus on suspension, tires, brakes, and ergonomics progress faster and spend less money long term. Those who chase power first often plateau and feel disconnected from the bike.

The Ninja platform rewards thoughtful setup. When the right parts are installed in the right order, the bike becomes predictable, stable, and confidence-inspiring.

Final Perspective

The Kawasaki Ninja does not need to be transformed to succeed on track. It needs to be supported where it matters most. The parts that truly make a difference are not about speed bragging rights. They are about feel, feedback, and control.

For riders searching for Kawasaki Ninja track parts that matter most, the answer is clear. Build the foundation first. When the bike communicates clearly and responds consistently, lap times follow naturally.

(Commenting: OFF)

Pushing a Kawasaki hard on the track is one of the most addictive experiences a rider can have. The throttle response, the chassis balance, and the way the engine pulls through the mid and top end all encourage you to ride faster and longer. But track riding also exposes one weakness that street use often hides: heat management. Engines that feel perfectly fine on public roads can start running hotter than expected once lap after lap stacks up. High RPM, sustained throttle, reduced airflow in slower sections, and aggressive riding all combine to stress the cooling system. For Kawasaki owners who take their bikes to track days, understanding which parts actually keep the engine cool is not optional. It is the difference between consistent performance and mechanical trouble. This guide breaks down the Kawasaki motorcycle parts that genuinely matter when it comes to cooling, especially in track conditions, and how smart upgrades can protect both performance and engine life.

Why Track Days Push Kawasaki Engines Harder Than Street Riding?

Street riding gives engines time to recover. Traffic, stops, cruising speeds, and varying RPMs all allow temperatures to stabilize. Track riding removes those breaks entirely.

On the circuit, the engine lives in the upper rev range. Cooling fans rarely help at speed, oil temperatures climb quickly, and coolant works harder than it ever does on the street. Kawasaki sport and naked models are well engineered, but even the best factory setups are designed for mixed use, not sustained track abuse.

When riders search for Kawasaki motorcycle parts related to overheating, it is usually because they have experienced one of the following:

  • Rising temperature warnings after a few sessions
  • Power fading as heat builds
  • Oil thinning and losing pressure
  • Coolant pushing past safe limits

These are signs that the cooling system is reaching its threshold.

Radiators and Why Upgraded Units Matter on Track?

The radiator is the first line of defense against engine heat. Stock Kawasaki radiators are efficient for daily riding, but on track days, they can become a bottleneck.

Aftermarket high-capacity radiators improve cooling by increasing surface area and fluid volume. Thicker cores and improved fin designs allow more heat to dissipate as air passes through at speed. This is especially valuable on tighter tracks where airflow is inconsistent.

For riders running ZX series bikes or Z models on track, an upgraded radiator helps maintain stable temperatures session after session instead of creeping upward every lap.

Silicone Radiator Hoses and Coolant Flow Stability

Rubber hoses work fine when new, but under track heat cycles, they soften, expand, and degrade faster. Silicone radiator hoses maintain their shape even at higher temperatures, ensuring consistent coolant flow.

Better flow means better heat transfer. Silicone hoses also resist pressure spikes that can occur during aggressive riding. This is one of those Kawasaki motorcycle parts upgrades that does not add horsepower but protects everything that makes horsepower possible.

On track bikes, reliability matters just as much as speed.

Thermostats and Why Some Riders Replace Them

Thermostats regulate when coolant starts flowing through the radiator. Stock units are calibrated for street riding, warm-up times, and emissions efficiency.

Track riders often choose lower temperature thermostats. These allow coolant to circulate earlier, keeping operating temperatures more stable during aggressive riding. The engine reaches optimal temperature sooner and stays there, instead of swinging between hot and hotter.

This upgrade is subtle but effective, especially for riders who notice temperature spikes early in sessions.

Oil Coolers and the Role of Engine Oil in Heat Control

Many riders focus only on coolant temperature, but oil temperature is just as critical. Oil does more than lubricate. It carries heat away from internal components like pistons, bearings, and crankshafts.

On Kawasaki sport bikes used for track days, oil temperatures can rise faster than coolant temperatures. An upgraded oil cooler increases oil capacity and improves heat dissipation, helping maintain proper viscosity and pressure.

Stable oil temperatures mean consistent throttle response, smoother power delivery, and reduced wear during long sessions.

Cooling Fans and Airflow Management

At speed, airflow does most of the cooling work. But during pit stops, slow laps, or technical sections, fans still matter.

High-performance cooling fans or upgraded fan controllers allow fans to activate sooner and run more efficiently. This helps prevent heat soak when the bike slows down or sits briefly between sessions.

Airflow management also includes ducting and shrouds that guide air directly through the radiator instead of letting it escape around it. Small changes here can make a noticeable difference.

High Performance Coolants and Why They Are Not Just Marketing

Not all coolants are the same. Performance-focused coolants transfer heat more efficiently than standard antifreeze mixes and often operate at lower pressure.

Track riders often choose coolants designed to reduce boiling points and eliminate steam pockets inside the cooling system. This improves heat transfer and prevents sudden temperature spikes under load.

While coolant alone will not fix an undersized system, it complements upgraded Kawasaki motorcycle parts by maximizing their effectiveness.

Water Pumps and Flow Consistency at High RPM

At sustained high RPM, coolant flow rate matters. A worn or marginal water pump can struggle to keep up with demand.

High-flow water pumps or upgraded impellers improve circulation through the engine and radiator. This helps prevent hot spots, especially in engines that spend long periods near redline.

For riders who track older Kawasaki models or high-mileage bikes, inspecting and upgrading the water pump is often overlooked but extremely important.

Preventive Maintenance That Keeps Cooling Systems Effective

Even the best parts fail if maintenance is ignored. Track riders should treat cooling system checks as routine, not optional.

This includes:

  • Flushing coolant regularly
  • Inspecting hoses and clamps
  • Checking radiator fins for debris or damage
  • Verifying fan operation
  • Monitoring oil condition and temperature

Small issues become big problems quickly on the track.

Choosing the Right Cooling Upgrades for Your Kawasaki

Not every rider needs every upgrade. The right combination depends on riding style, climate, and bike model.

A beginner track rider may only need fresh coolant and better hoses. Experienced riders pushing lap times often benefit from radiators, oil coolers, and airflow improvements. The key is understanding how heat builds and addressing the weak points before they cause failures.

This is where selecting the right Kawasaki motorcycle parts matters. Cooling upgrades are not about chasing numbers. They are about consistency, reliability, and confidence when pushing the bike hard.

Conclusion

Track riding exposes the limits of both rider and machine. Kawasaki engines are known for durability and performance, but heat is the enemy of both. The right cooling-focused parts allow the engine to operate where it performs best without sacrificing longevity. Whether you ride occasional track days or push your Kawasaki hard every weekend, investing in cooling system upgrades pays off in smoother sessions, fewer mechanical surprises, and a bike that performs the same on lap ten as it did on lap one.

(Commenting: OFF)

Or login with your social account