bikerbiker Aliwheels is a leading motorcycle parts supplier offering free shipping anywhere in the world on orders above $300. Please note that all of our motorcycle parts and accessories are certified and tested. With more than 10,000* products to choose from this is your one place to get the motorcycle part you need. Browse our vast inventory of motorcycle radiators, fairings, clutch plates, headlights, chains, and sprockets. biker

Free Shipping over $300

Support 24/7

Secure Payments

Hot Offers

Walk into any motorcycle forum, and someone is arguing about a motorcycle lighting upgrade. Half the riders swear by them. The other half says their old halogen was better. So who is right? And more importantly, should you upgrade?

Here is the honest, balanced answer every rider needs before spending money.

LED vs. Halogen Motorcycle Headlights: What Are You Really Choosing Between?

Halogen bulbs have powered motorcycle headlights for decades. They work by heating a tungsten filament inside a halogen gas-filled bulb. The light output is warm and yellowish, typically around 2,800 to 3,200 Kelvin. They are cheap to replace and universally available.

LED headlights work differently. They generate light through semiconductor diodes with no filament to burn out. The color temperature runs between 4,300 and 6,500 Kelvin, which produces a cooler, whiter beam. According to a detailed comparison by Bliauto, quality LEDs typically last between 20,000 and 50,000 hours. Standard halogen bulbs last 300 to 1,000 hours by comparison.

That lifespan gap alone is significant for any rider who puts real miles on a bike.

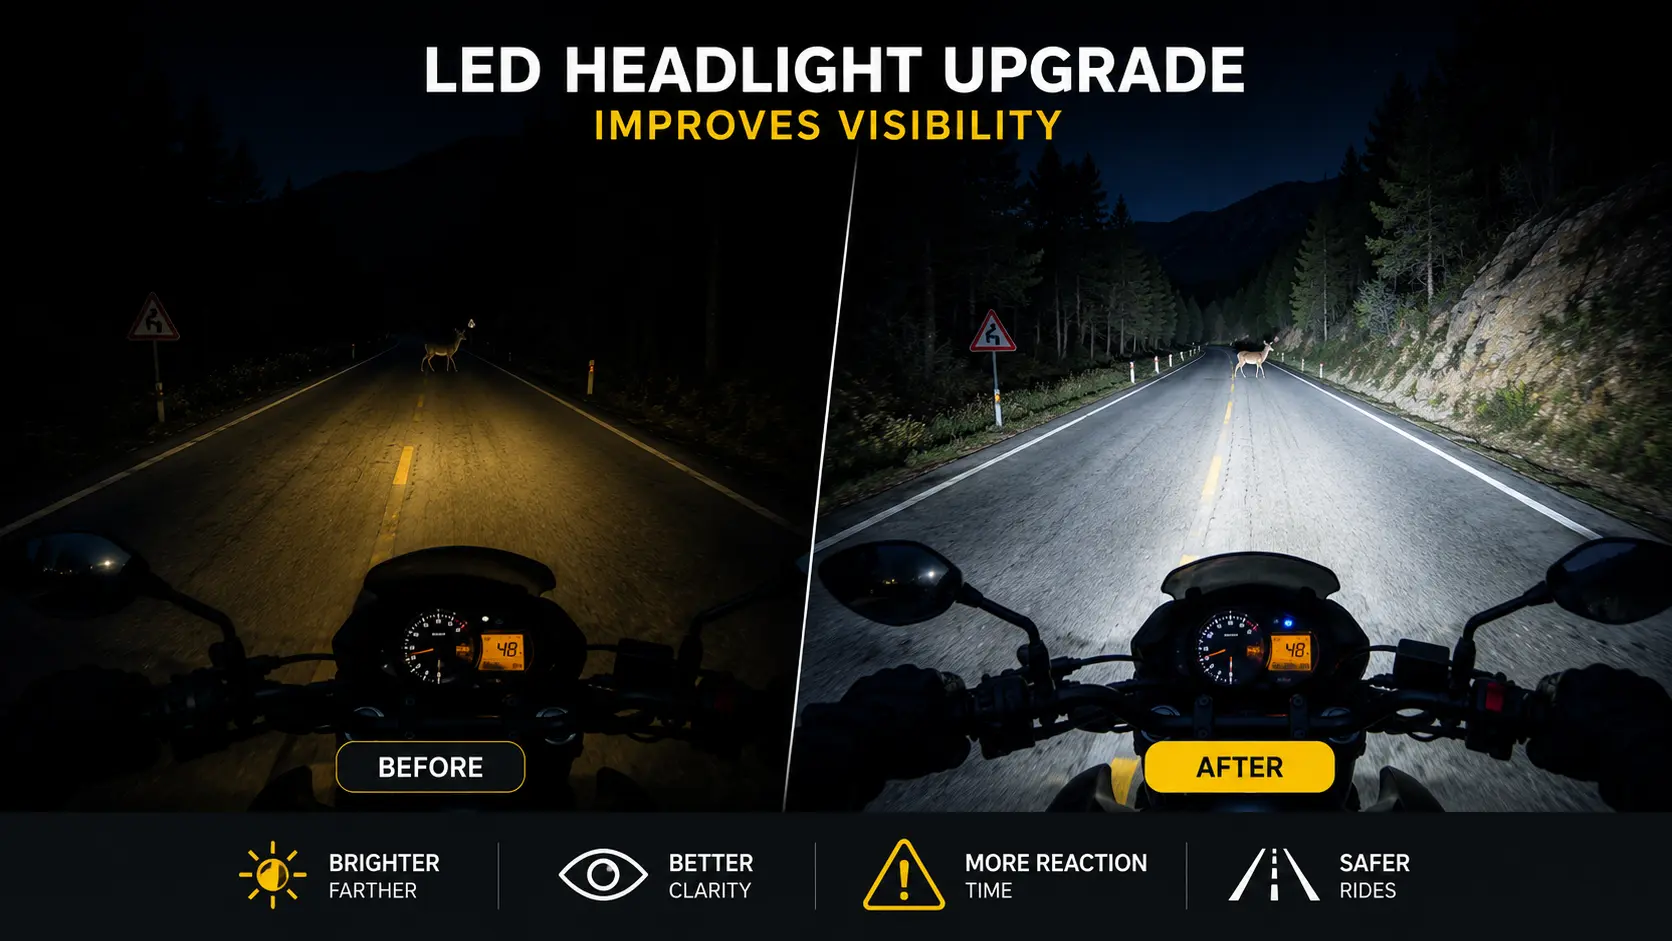
Motorcycle LED Headlight Upgrade Actually Improves Visibility?

The honest answer is: it depends on the quality of the LED and how well it is aimed.

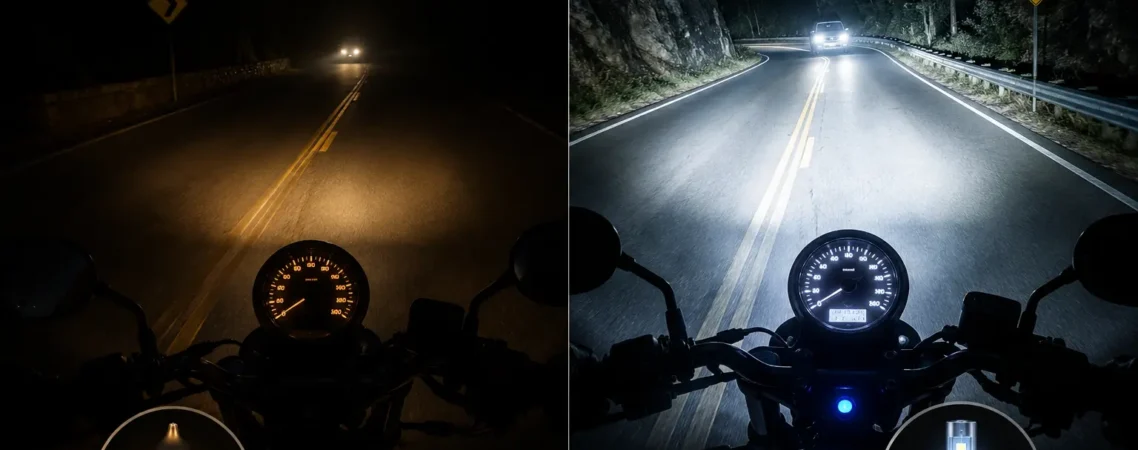
A quality LED produces a stronger, more controlled beam pattern at night. It reaches further down the road. It creates better contrast between the road and the shoulder. On dark backroads and rural highways, the difference is genuinely noticeable.

RevZilla’s lighting guide confirms that drop-in LED upgrades for common bulb types like H4 are a legitimate improvement. However, they caution against installing off-road-only LED units that scatter light improperly and create dangerous glare for oncoming drivers.

The upgrade matters most for riders who regularly ride after dark, in rain, or on unlit roads. If you only ride in daylight in urban areas, the visibility benefit is smaller.

Difference after upgrading motorcycle LED headlight

The Daytime Visibility Problem Nobody Mentions in LED Headlight Reviews

Here is where it gets interesting. A thread on Harley-Davidson Forums raised a counterargument that experienced riders know well.

One rider who drives nearly 1,000 miles a week for work shared his observation: halogen headlights are actually easier to spot in daytime because of their warm scattered light. LED beams are tightly focused and can appear to blend into other light sources during the day, especially at a distance.

This does not mean LED is worse overall. However, it does mean that daytime conspicuity, meaning how easily other drivers notice you, is not automatically improved by switching to LED. Some riders counter this by adding daytime running lights or auxiliary lighting alongside their LED upgrade.

The bottom line from MOONSMC’s LED research: the goal is controlled, visible light that helps other drivers identify you faster, not raw blinding brightness.

How an LED Headlight Upgrade Reduces Strain on Your Motorcycle Battery?

LEDs use significantly less power than halogen bulbs. That means less draw on your charging system and less strain on your battery. For bikes already running electrical accessories like heated grips, GPS units, or phone chargers, this matters.

According to Eagle Lights’ comparative guide, LEDs draw less wattage for equivalent or better light output. On older bikes with marginal charging systems, switching to LED can actually reduce electrical load meaningfully.

This ties directly back to battery health. Less electrical stress means your battery lasts longer. That is a real-world benefit beyond just the beam quality.

What to Check Before You Buy a Motorcycle LED Headlight?

Not all LED upgrades are equal. Here are the critical points to check:

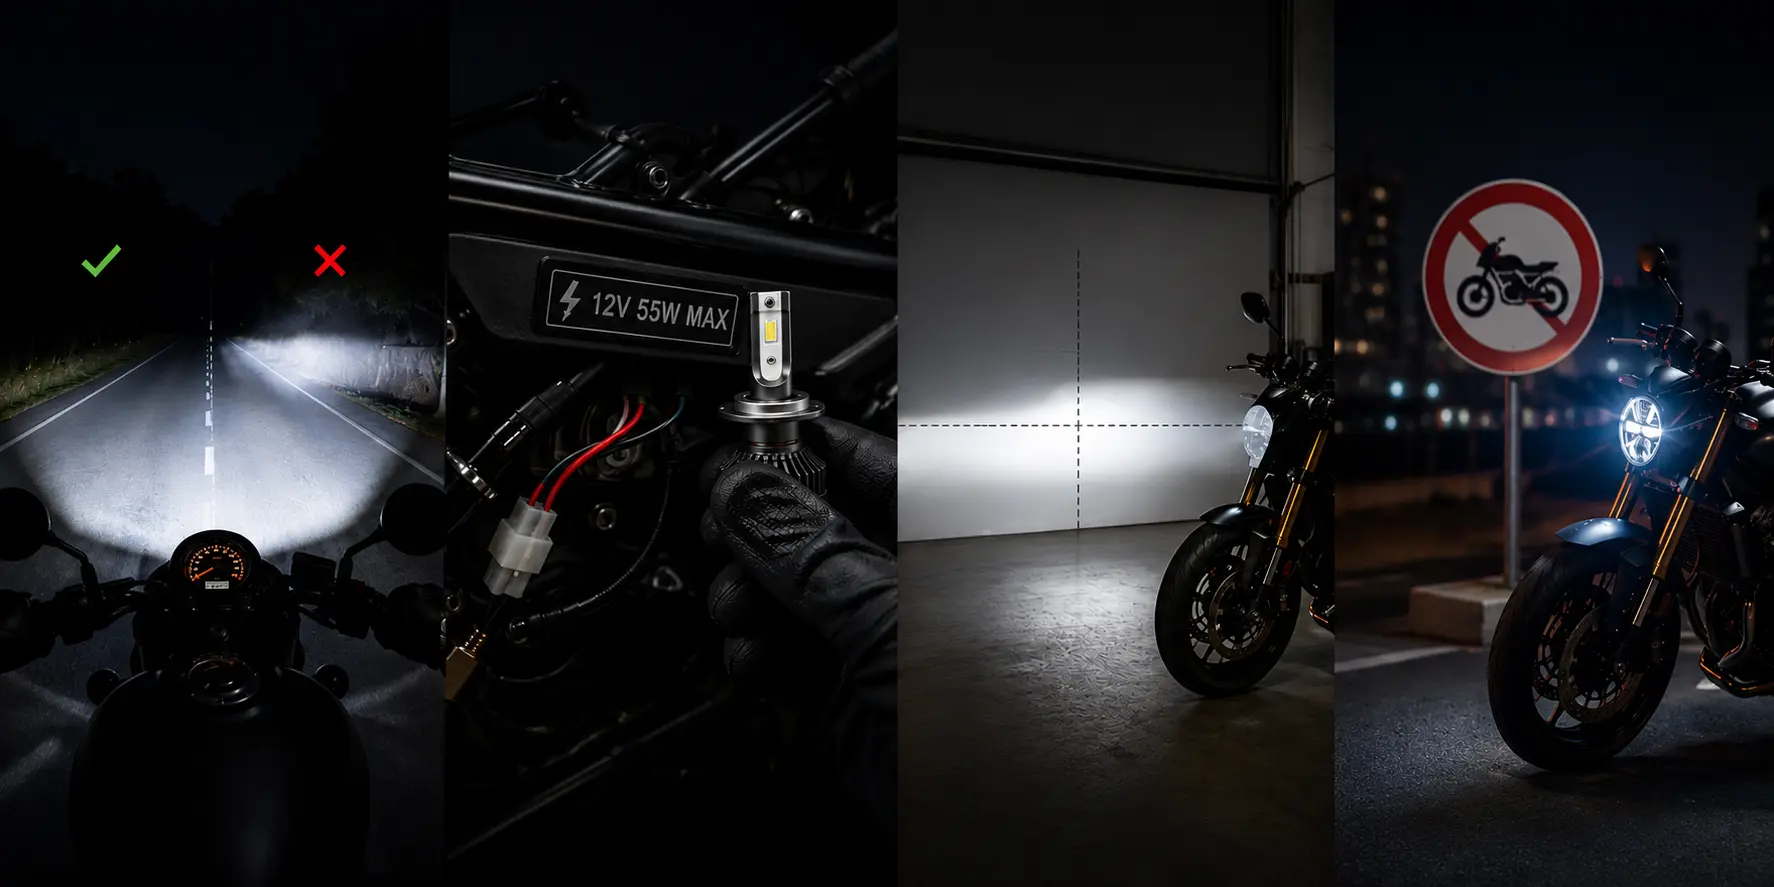
Beam pattern matters more than brightness numbers. A poorly designed LED retrofit scatters light in the wrong directions. It blinds oncoming traffic without lighting your actual road. Always look for E-mark-certified units or reviews confirming proper beam cutoff.

Check wattage limits for your bike. Aliwheels explicitly warns against installing higher wattage bulbs than your bike was designed to handle. Overloading your wiring harness can melt connectors or cause a fire.

Aim the headlight properly after installation. The beam needs to be set at the correct angle. A misaimed LED, even a high-quality one, creates glare and reduces effective road illumination.

Check local road regulations. Some regions have specific rules about headlight color temperature and beam patterns. Off-road-only lighting marked as such is not street legal in most jurisdictions.

What to Check Before You Buy a Motorcycle LED Headlight

Is a Motorcycle LED Headlight Upgrade Worth It?

For most riders, yes. But only with the right product. The combination of longer lifespan, lower energy draw, and better night visibility makes a quality LED upgrade a smart investment over time.

The keyword is quality. A cheap no-name LED kit that scatters light poorly is worse than your stock halogen. Spend a little more for a reputable unit with a proper beam pattern and road-legal certification.

If you ride at night regularly, the upgrade pays for itself quickly. If you ride exclusively in daylight, the benefits are real but less dramatic.

Browse Aliwheels Motorcycle Lighting category for lighting upgrades that fit your specific make and model. And if you are adding electrical accessories at the same time, check the Batteries and Electrical section to make sure your system can handle the load.

Conclusion 

A quality motorcycle LED headlight upgrade genuinely improves night visibility and lasts dramatically longer than halogen bulbs. They also reduce electrical load. However, beam quality and proper installation matter more than the brand or the lumen number on the box. Buy smart, aim correctly, and the upgrade is absolutely worth it.

(Commenting: OFF)

You roll off the throttle coming into a corner. Then you hear it. Pop, pop, pop, crackle. Some riders love the sound. Others are convinced something is broken. The truth? It depends entirely on why it is happening. Motorcycle exhaust popping on deceleration is one of the most misunderstood issues in motorcycling. Let’s cut through the noise and give you clear answers.

Is Motorcycle Exhaust Popping on Deceleration Actually Harmful?

Sometimes, no. A light pop or crackle on deceleration can be completely normal, especially on bikes with aftermarket exhausts. However, excessive or sharp popping often signals a real problem that will cause long-term damage if ignored.

The key difference: a soft rhythmic crackle is usually harmless lean-condition tuning. A loud explosive bang on deceleration is a backfire, and that is a different story entirely. Backfires can physically damage your exhaust valves, headers, and even crack exhaust pipes over time.

Riders on DRRiders.com and ADVrider.com forums consistently separate the two. Light decel pop is tolerable, but heavy repeated banging means something is genuinely wrong.

What Causes Motorcycle Exhaust Popping on Deceleration?

5 causes Motorcycle Exhaust Popping on Deceleration

1. The Engine Is Running Lean

This is the most common cause, according to WulfMoto’s technical breakdown on deceleration popping. When you close the throttle, the engine momentarily pulls in more air than fuel. That lean condition means unburnt fuel exits into the exhaust.

Your exhaust headers are extremely hot. When that unburnt fuel hits them, it ignites. That is your pop.

Most stock ECUs are tuned lean from the factory to pass emissions standards. Install a free-flowing exhaust, and the problem often gets worse because you have opened up airflow without retuning the fuel map.

2. You Fitted a New Exhaust and Didn’t Retune

This catches riders off guard all the time. You install a new slip-on or full exhaust system. Everything sounds amazing at first. Then the popping starts.

The reason is simple. Aftermarket exhausts change the exhaust flow characteristics. Without an updated fuel map or ECU flash, your fueling is now mismatched to the new system. The result is a lean condition, which causes decel pop.

According to MyBikeForums.com members who ran this exact issue after installing aftermarket pipes, the fix almost always involves fuel management, whether through a fuel controller, a Power Commander, or a full ECU remap.

3. There’s a Leak at the Header or Mid-Pipe

A small gap at the header gasket or mid-pipe joint lets outside air sneak into the exhaust stream. That extra oxygen is enough to ignite leftover fuel inside the pipe. The fix here is mechanical, not tuning-related.

Bareass Choppers’ motorcycle tech pages recommend a simple smoke test to find exhaust leaks. With the bike running, pass a lit incense stick or match near the header flanges and pipe joints. If the smoke gets disturbed, you found your leak.

4. Your Bike Has a Secondary Air System Pumping Air In

Many modern fuel-injected bikes pump fresh air into the exhaust on deceleration. It is an emissions compliance feature. But that extra oxygen burns leftover fuel and causes popping.

Removing or blocking the secondary air system, sometimes called a SAI block-off, is a popular and effective fix on many naked bikes and sportbikes. Check your model-specific forum to see if this applies to your bike.

5. Air Is Getting In Where It Shouldn’t

Air leaking into the intake side of the engine has the same effect as a lean fuel map. It throws off the air-to-fuel ratio across all throttle positions, including closed-throttle deceleration.

Common culprits include cracked intake boots, loose carburettor connections, and deteriorated intake manifold gaskets, especially on older bikes.

How to Diagnose Deceleration Popping on Your Motorcycle? 5 Simple Steps

5 Steps to Diagnose Deceleration Popping on Your Motorcycle

Start with the simplest checks first. This saves time and money.

Step 1: Check for exhaust leaks at the header flanges and pipe joints. Look for black soot marks around joints, which almost always indicate a leak.

Step 2: Inspect intake boots and carburettor connections for cracks or looseness. Spray a small amount of carb cleaner near connections while the bike idles. Any RPM change indicates a vacuum leak.

Step 3: Check whether the secondary air injection system is active on your bike. If so, consider a block-off kit.

Step 4: If the popping started after installing an aftermarket exhaust, the issue is almost certainly fueling. You need a fuel management solution.

Step 5: If you run a carburettor, a slightly richer idle mixture screw setting often reduces or eliminates light decel pop. Start at 1.5 turns out and adjust incrementally.

Fix Motorcycle Exhaust Popping on Deceleration

For fueling issues, a fuel management controller or ECU remap is the proper solution. For exhaust leaks, new header gaskets fix it cleanly and cheaply. For vacuum leaks, fresh intake boots or carb seals solve the problem. For secondary air injection, a block-off plate does the job.

Upgrading your exhaust system properly from the start avoids most of these problems. Browse Aliwheels‘ full range of motorcycle exhaust systems for options that fit your exact make and model. And if fueling is your issue, the Air and Fuel category covers fuel management and air cleaner solutions in one place.

When Motorcycle Backfires on Deceleration, It Means Stop Riding

If the popping is occasional and light, you can ride while you diagnose. However, stop riding if you are hearing loud bangs, seeing backfires through the intake, noticing a loss of power, or smelling fuel strongly near the exhaust. Those are signs of a serious lean condition that can melt pistons or exhaust valves.

Take it seriously before it becomes expensive.

Conclusion 

Motorcycle exhaust popping on deceleration comes down to one root cause: unburnt fuel igniting in a hot exhaust. The trigger is almost always a lean condition from factory ECU tuning, an aftermarket exhaust without retuning, an exhaust leak, secondary air injection, or a vacuum leak. Diagnose it methodically. Fix the root cause. Do not just turn up the idle and call it done.

(Commenting: OFF)

Your motorcycle battery keeps dying. You replace it. Then it dies again. Sound familiar? Most riders blame the battery. But here is the truth. A bad motorcycle voltage regulator is usually the real culprit. And if you keep ignoring it, you will keep burning through batteries and frying electrical parts until something bigger gives out.

Let’s break it down so you can catch the problem early.

What a Motorcycle Voltage Regulator Actually Does?

Think of the voltage regulator as the gatekeeper of your bike’s electrical system. Your engine produces AC power through the alternator. The regulator converts that into usable DC power. Then it keeps the voltage steady, typically between 13.5V and 14.7V, so nothing gets overloaded.

According to J.D. Power’s motorcycle maintenance guides, a healthy regulator keeps your charging system balanced. When it fails, everything downstream suffers. That includes your battery, your headlights, and your ignition system.

Without a functioning regulator, your bike either gets too little charge or dangerously too much. Either way, it is a problem.

6 Motorcycle Voltage Regulator Symptoms You Should Not Ignore

6 Motorcycle Voltage Regulator Symptoms

1. Your Motorcycle Battery Keeps Dying No Matter How Many You Replace

This is the most obvious sign. However, most riders replace the battery and call it done. If your new battery drains within days or weeks, the regulator is not giving it a proper charge. The battery is a victim, not the cause.

Riders on forums consistently report this pattern. Multiple new batteries get installed before anyone diagnoses the failed regulator.

2. Lights Dim at Idle Then Brighten When You Rev

This is a classic tell. At idle, your engine spins slower and produces less power. A weakening regulator cannot compensate properly. So your lights dim or flicker. Then as RPMs climb, suddenly everything looks brighter.

That flickering is your electrical system screaming for attention. Do not ignore it.

3. Bulbs Are Burning Out Way Too Fast

On the flip side, overvoltage is just as dangerous. When the regulator fails in the other direction, it sends too much voltage through your system. Bulbs burn out faster than normal. Electronic components get fried over time.

The NHTSA issued formal recalls on both Kawasaki and Ducati models specifically because overheating voltage regulators caused overcharging conditions. Both manufacturers replaced the regulator as the solution.

4. The Bike Cuts Out Without Warning While Riding

If your regulator cannot maintain charge, your battery slowly drains while you ride. Eventually, the ignition system loses enough power to cut out entirely. Without warning. At highway speed.

This is not just a frustrating breakdown. It is a genuine safety risk. Kawasaki’s recall notice specifically highlighted engine stalling while riding as a crash risk linked to regulator failure.

5. Something Smells Like It’s Burning Near the Electrics

A failing regulator runs hot. When it starts to overheat, it can burn surrounding wires and connectors. If you notice a burning plastic or electrical smell, especially after longer rides, check the regulator immediately.

According to motorcycle mechanics on forums like Triumph Rat and ADVrider, regulator overheating is especially common on bikes where the unit is mounted near the exhaust or behind fairings with poor airflow.

6. Your Multimeter Confirms a Bad Voltage Regulator

If you own a multimeter, this is the easiest confirmation step. Start your bike and let it reach normal temperature. Connect the multimeter across the battery terminals. At around 3,000 RPM, a healthy system should read between 13.5V and 14.7V.

Below 13V means your regulator is undercharging. Above 15V means it is overcharging. Either reading confirms the regulator needs replacement.

When a Motorcycle Voltage Regulator Fails

Heat is the number one enemy of any motorcycle voltage regulator. Regulators are often tucked into tight spaces with poor ventilation. Over time, thermal stress breaks down internal components. Dirty or corroded connections also force the regulator to work harder, which accelerates failure.

Older bikes with high-mileage electrical systems are especially vulnerable. However, even newer bikes are not immune, as seen with the Harley-Davidson voltage regulator wire recall affecting nearly 42,000 motorcycles.

Motorcycle Voltage Regulator Fails

How to Fix a Bad Voltage Regulator on Your Motorcycle?

First, test your system with a multimeter before spending money on parts. If the readings confirm a faulty regulator, do not wait. The longer you ride with a failing one, the more damage it causes downstream.

Second, replace the regulator and the battery at the same time if the battery has been subjected to undercharging or overcharging for a while. A compromised battery paired with a new regulator is a recipe for continued frustration.

You can find quality replacement voltage regulators for Honda, Yamaha, Kawasaki, Suzuki, Ducati, BMW, KTM, and more at Aliwheels Voltage Regulator, with free worldwide shipping on orders over $300. Browse the full Batteries and Electrical category to cover everything your charging system needs.

Conclusion

Your voltage regulator is a small part with a massive job. If your battery keeps dying, your lights are flickering, your bulbs blow out frequently, or your bike stalls unexpectedly. Stop replacing symptoms and start diagnosing the real cause.

Test it. Get it Replaced from Aliwheels today!

(Commenting: OFF)

Your clutch is slipping. It takes longer to fully engage. Or maybe the feel is just off.

You know something needs fixing. But clutch replacement sounds expensive and complicated. So you keep riding and hoping it improves on its own.

Here is the truth. Clutch problems do not fix themselves. They get worse. And the longer you wait, the more damage you do to the rest of your drivetrain.

But the good news is that Aliwheels quality motorcycle clutch plates and kits are more affordable than many riders think. And if you understand what you are doing, replacement is very doable.

Let’s talk about affordable clutch solutions and how to get your bike’s clutch back to working perfectly.

Motorcycle Clutch in Action

Before you can understand clutch problems, you need to understand how the clutch works.

Your clutch is basically a stack of friction plates and steel plates pressed together. When you pull the clutch lever, hydraulic pressure releases that pressure. The friction plates separate from the steel plates.

When the pressure releases and the plates separate, engine power no longer connects to the transmission. You can shift gears without grinding.

When you release the clutch lever, the pressure reapplies, and the plates press together again. They create friction that transfers engine power to the transmission.

The friction from all those plates pressing together is what actually transfers power. Over time, that friction material wears down. The plates become thinner. Eventually, they cannot create enough friction anymore.

That is when you need replacement motorcycle clutch plates.

How to Know if Your Clutch Plates Need Replacement

Your clutch slips under acceleration. You open the throttle, and the engine RPM climbs, but power does not transfer efficiently. The bike accelerates slowly despite the engine revving. That is slipping.

Slipping usually means you have days or weeks left before the clutch becomes unusable.

It takes excessive lever pressure to fully engage. The clutch used to feel light and responsive. Now it feels heavy and requires a lot of hand pressure to fully engage the gears.

The clutch takes longer to engage than it used to. Pulling the lever has a much longer zone before the clutch actually grabs the transmission. The bite point keeps moving.

You smell burning when using the clutch heavily. A burnt smell from the clutch area means friction material is burning and wearing away. That smell means replacement is imminent.

Real example: A rider reported a burning smell on a Sunday ride. By Wednesday, the clutch was slipping too much to ride safely. The smell was an early warning sign.

The clutch feel is inconsistent or unpredictable. Sometimes it engages smoothly. Other times it grabs suddenly. That inconsistency points to worn plates with uneven friction surfaces.

You cannot downshift smoothly without rev-matching. A worn clutch does not fully separate the engine from the transmission. Downshifting without rev-matching becomes rough or grinds.

Old worn clutch plates being replaced with new clutch plates

Wet Clutch vs Dry Clutch

Most street motorcycles use wet clutches. The friction and steel plates operate in engine oil. The oil cools the clutch and reduces wear.

Some performance and racing bikes use dry clutches. These operate without oil surrounding them. They can handle extreme heat and power but require more maintenance.

Know which type your bike has before ordering replacement plates. Wet clutch plates are different from dry clutch plates. Installing the wrong type creates problems.

Your service manual will tell you which type your bike has. If you are not sure, ask your parts supplier before ordering.

OEM vs Quality Aftermarket Clutch Plates

Here is where affordable options come in.

OEM clutch plates are manufactured to the exact specification your bike needs. They work perfectly and are guaranteed compatible. They also cost the most.

Quality aftermarket clutch plates from reputable manufacturers meet or exceed OEM specifications. They cost significantly less. They also work very well.

Budget aftermarket clutch plates are cheap. They might work. They might also fail prematurely or not provide the friction characteristics your bike expects.

Cost comparison: OEM clutch kit runs $250 to $400. A quality aftermarket kit runs $100 to $200. Budget kits run $50 to $80.

Real test: A quality aftermarket kit on an SV650 lasted 35,000 miles. A budget kit on the same bike lasted 8,000 miles. The cost difference was about $50. Quality paid for itself within 2,000 miles.

For affordable replacement, buy quality aftermarket plates from a known brand. Not the cheapest option you find. A middle-ground option between OEM and budget brands.

Choosing the Right Clutch Kit for Your Bike

A complete clutch replacement kit includes new friction plates, steel plates, gaskets, and springs.

Kits make sense if your clutch failure is severe. You are replacing everything at once so you do not have clutch problems again for years.

If your clutch is just starting to slip, sometimes just the friction plates need replacement. Steel plates usually last much longer. Replacing only worn friction plates costs less than a full kit.

Cost savings: Friction plates alone run $60 to $120. A full kit runs $100 to $200. If you only need friction plates, the savings are real.

Your bike’s service manual specifies what your bike needs. It tells you whether a full kit is required or whether friction plate replacement alone is sufficient.

Installation Complexity Cost 

Here is where the affordability calculation changes.

If you are mechanically inclined and have basic tools, clutch replacement is doable at home. It requires removing the engine or transmission depending on your bike. It also requires specific alignment tools.

For most riders, professional installation is the practical choice. A mechanic can do it in a few hours. The labor cost is worth not risking something going wrong.

Labor cost estimate: Independent mechanics typically charge $200 to $400 for clutch replacement labor. Dealerships charge $300 to $600.

So when calculating total cost, include both the parts and the labor. An affordable clutch plate kit plus reasonable labor is still much less expensive than waiting until the clutch fails and you damage the transmission.

Total replacement cost: quality aftermarket kit ($100 to $200) plus labor ($200 to $400) equals $300 to $600 total. Much less than transmission damage repair.

Clutch Wear Varies With Riding Style

City riding wears out clutches faster than highway riding. The constant low-speed maneuvering, lane filtering, and parking lot creeping all use the clutch hard.

Aggressive riding wears out clutches faster than smooth riding. Rapid clutch engagement or riding with a partially engaged clutch accelerates wear.

Sport bike riding wears out clutches faster than cruiser riding because sport bikes use the clutch more aggressively in performance riding.

Wear timeline comparison: Highway commute clutch lasts 40,000 to 60,000 miles. City commute clutch lasts 20,000 to 35,000 miles. Aggressive sport bike riding, 10,000 to 20,000 miles.

Understanding your riding style helps you know whether your clutch failure was premature or normal wear. If your bike is heavily used in city riding, clutch wear every 20,000 to 40,000 miles is normal. That is not a defect.

Riding Style Comparison of City Rider and Highway Rider.

How to Extend Your Motorcycle Clutch Life?

Smooth clutch operation extends life dramatically.

Engage the clutch fully and quickly. Do not slip the clutch. Do not ride with the clutch partially engaged at any point.

Avoid rapid acceleration from a standstill. Rolling acceleration is easier on the clutch than a hard launch.

In city riding, avoid excessive creeping in traffic. Keep the bike moving smoothly. That reduces clutch wear significantly.

Real example: Two riders on identical 2019 Kawasaki Ninjas. One rode smoothly and changed gears normally. The clutch lasted 38,000 miles. The other rider slipped the clutch and launched hard frequently. The clutch lasted 12,000 miles. Same bike, vastly different wear.

On a carbureted bike, ensure the engine is properly tuned. A rich or lean running condition increases clutch temperature and accelerates wear.

Proper maintenance of your engine oil also protects your clutch. Old, dirty oil reduces cooling around the clutch. Fresh oil keeps it cooler.

Conclusion

A worn clutch is a fixable problem. Quality replacement motorcycle clutch plates and kits are affordable. Professional installation is reasonably priced.

Do not ride with a worn clutch hoping it improves. It will not. Replace it and get back to riding a bike that works the way it is supposed to.

FAQ Section

Q: How much does a motorcycle clutch replacement actually cost?

A: An affordable quality clutch kit costs $100 to $200. Labor for professional installation typically costs $200 to $400 depending on your bike. Budget $300 to $600 total. Much less than transmission damage.

Q: Can I replace just the friction plates, or do I need a full kit?

A: Depends on the condition of your steel plates and springs. Your service manual specifies what needs replacing. Sometimes just friction plates is enough, saving $50 to $100.

Q: How do I know if my clutch is worn or if there is a different problem?

A: Slipping under acceleration is the most obvious sign. A burning smell and an inconsistent feel also indicate wear. A mechanic can diagnose definitively in 15 minutes.

Q: Is it cheaper to buy budget clutch plates than quality ones?

A: Cheaper upfront, yes. But budget plates often fail after 8,000 to 12,000 miles. Quality plates last 30,000+ miles. Quality pays for itself quickly.

Q: How often do motorcycle clutches need replacement on average?

A: Depends on riding style. City riders see wear every 20,000 to 40,000 miles. Highway riders might go 50,000 to 100,000 miles. Heavy performance riding wears them out in 10,000 to 20,000 miles.

(Commenting: OFF)

Or login with your social account