bikerbiker Aliwheels is a leading motorcycle parts supplier offering free shipping anywhere in the world on orders above $300. Please note that all of our motorcycle parts and accessories are certified and tested. With more than 10,000* products to choose from this is your one place to get the motorcycle part you need. Browse our vast inventory of motorcycle radiators, fairings, clutch plates, headlights, chains, and sprockets. biker

There’s a tiny, particular panic that hits when you’re miles from town and something on the bike sounds wrong. Long routes test all motorcycle parts, including tyre health, the charging system, fasteners that loosen from vibration, and little parts you didn’t think to replace before you left. Over years of riding and helping other riders, we are aware of the failures that actually stop trips, and the small, affordable parts that stop those failures from ending your day.

If you plan long runs, think less about a perfect spec sheet and more about redundancy and small fixes you can do on the side of the road. Riders’ planning checklist should include motorcycle road trip essentials, motorcycle breakdown kit, motorcycle puncture repair kit, and motorcycle travel tool set. These are practical queries, and the answers are practical too.

The three failures that most often end rides (and how to prevent them)?

1. Flats and Punctures Seem Tiny, But Ruin Mileage Plans

Nothing ruins momentum like a slow leak that turns into a flat two hours past the last town. Tubeless tyres are forgiving; many punctures can be fixed on the road,  but only if you have the kit and inflation capacity to get you to the next garage or home.

A compact tubeless repair kit and a reliable inflator are essentials. AliWheels stocks tubeless repair kits and inflators built for motorcycles; the kits include plugs, reaming tools, and the accessories you need for quick roadside repairs. For fast inflation, a rechargeable, compact pump makes the difference between a thirty-minute pit stop and a multi-hour wait:

Rechargeable air pump (compact, quick, and portable)

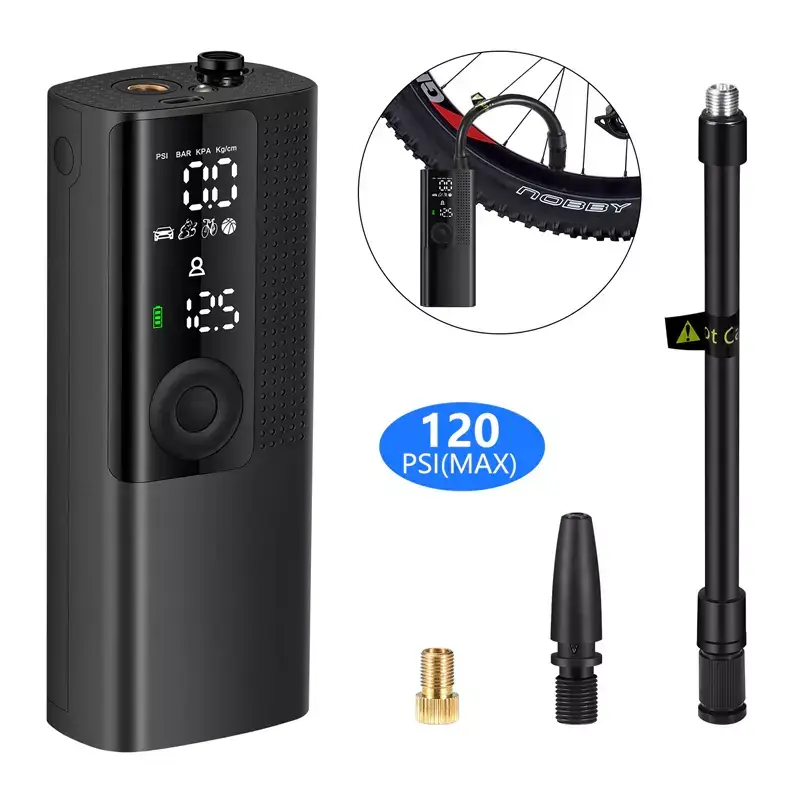
Carry that pump and a tubeless repair kit together in a small tailbag, and you’ll fix most screw or nail punctures on the spot. Pro tip: if you feel a puncture, stop and check pressure; riding on a low tyre destroys the tyre and rim.

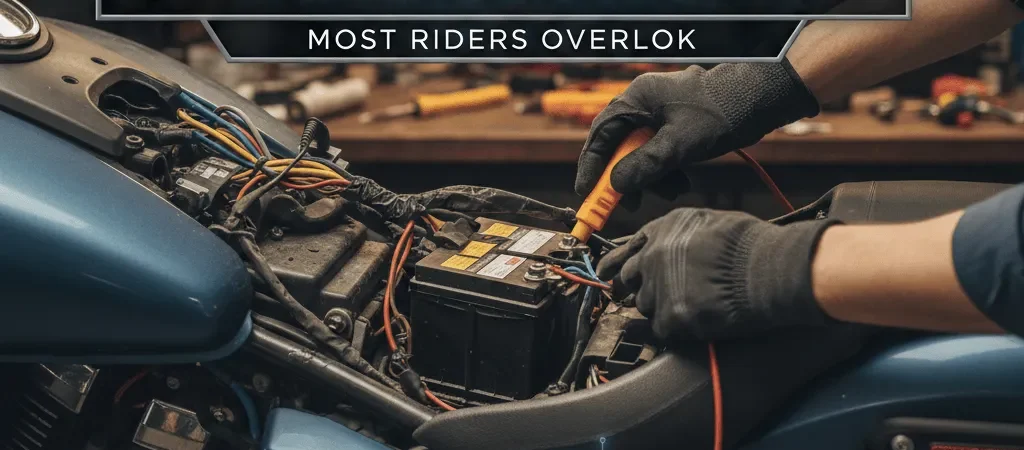
2. Dead Battery or Charging Issues, Electronics Should not be Optional

Long days mean lights, GPS, heated gear, phone use, and possibly accessory power draws. A weak stator, an old battery, or a bad connection can leave you with no start after an overnight stop. A small, portable charger or maintainer is cheap insurance; it keeps the battery topped between stops and lets you recover from a light-drain night.

On top of that, carry a basic electrical check while you’re riding: visual wiring inspection, secure ground points, and a quick check of charging voltage at idle. AliWheels lists battery and electrical accessories so you can add a travel charger or maintainer for longer trips.

(If you want a hard starter solution, consider a compact jump starter too, but always follow safe charging and manufacturer guidance.)

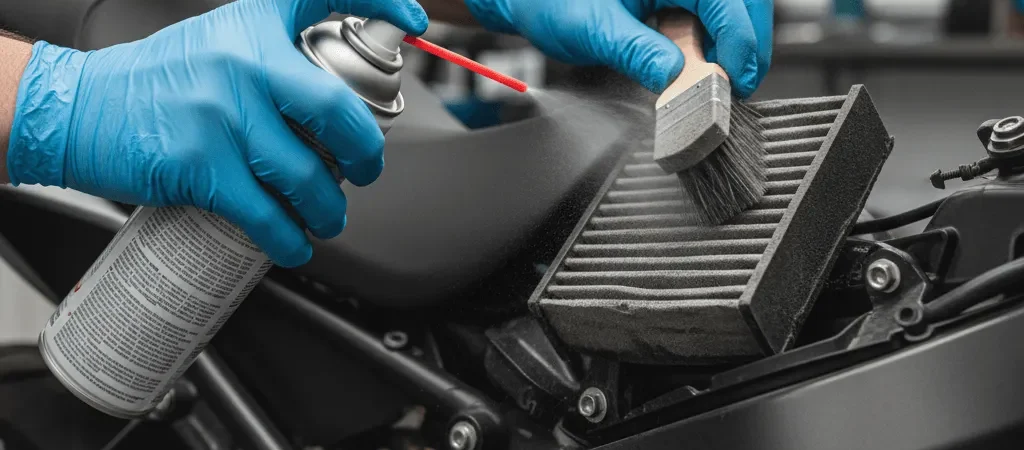
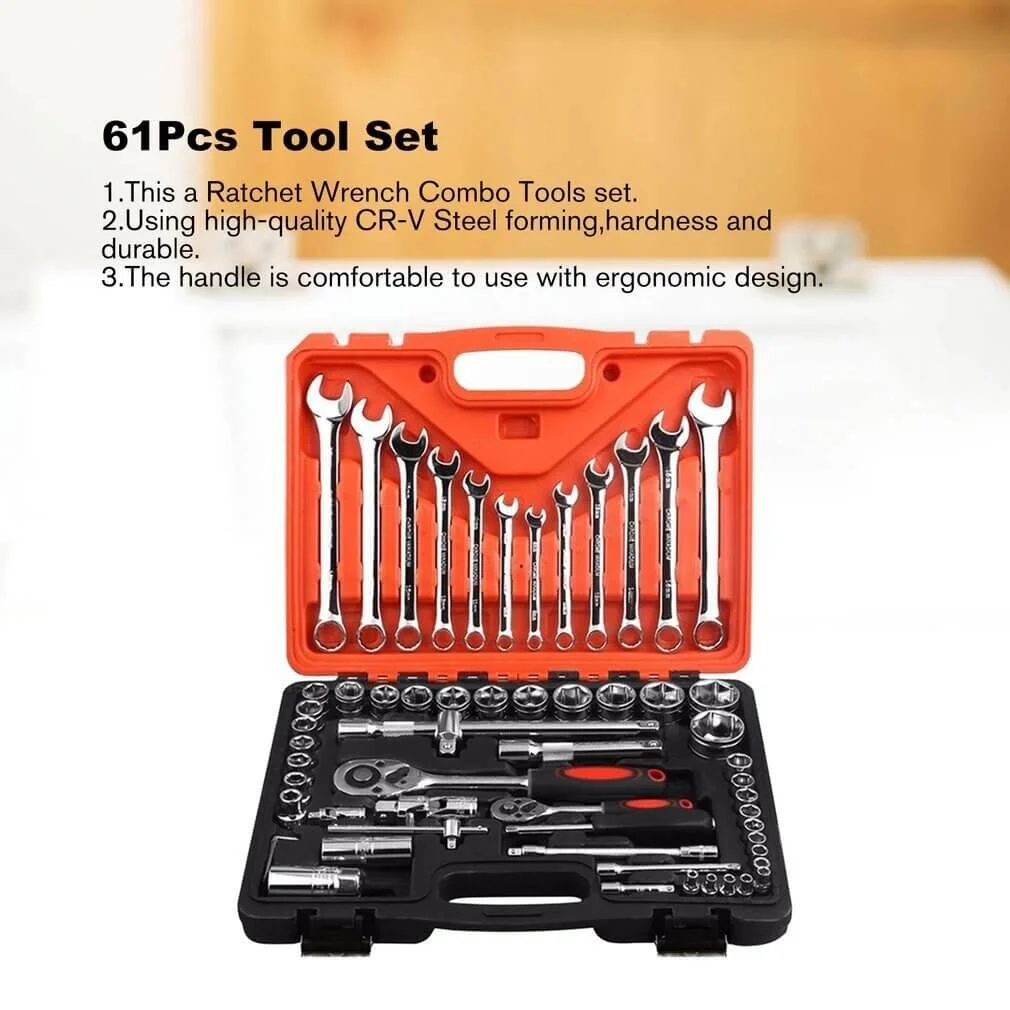
3. Missing tools, stripped fasteners, and minor mechanicals

Most route-stoppers are not catastrophic; they’re small, fixable problems that turn into big ones because the rider doesn’t have the right tool. Stripped bolts, a loose crash bar, a clutch cable that needs a minute of adjustment,  these are all fixable with a compact toolset and a few spare fasteners.

A proper travel tool kit should include wrenches, screwdrivers, a spark plug socket, Allen keys, and a handful of common fasteners. AliWheels carries several compact tool kits and multi-tool options that are designed for on-road use:

Motorcycle universal tool kit (good range of sockets and wrenches):

Motorcycle universal tool kit (good range of sockets and wrenches):


A compact Allen/hex kit for common on-bike bolts: https://www.aliwheels.com/product/motorcycle-bike-repair-tool-allen-key-hex-socket-wrench-kit-accessories/

 https://www.aliwheels.com/product/motorcycle-bike-repair-tool-allen-key-hex-socket-wrench-kit-accessories/

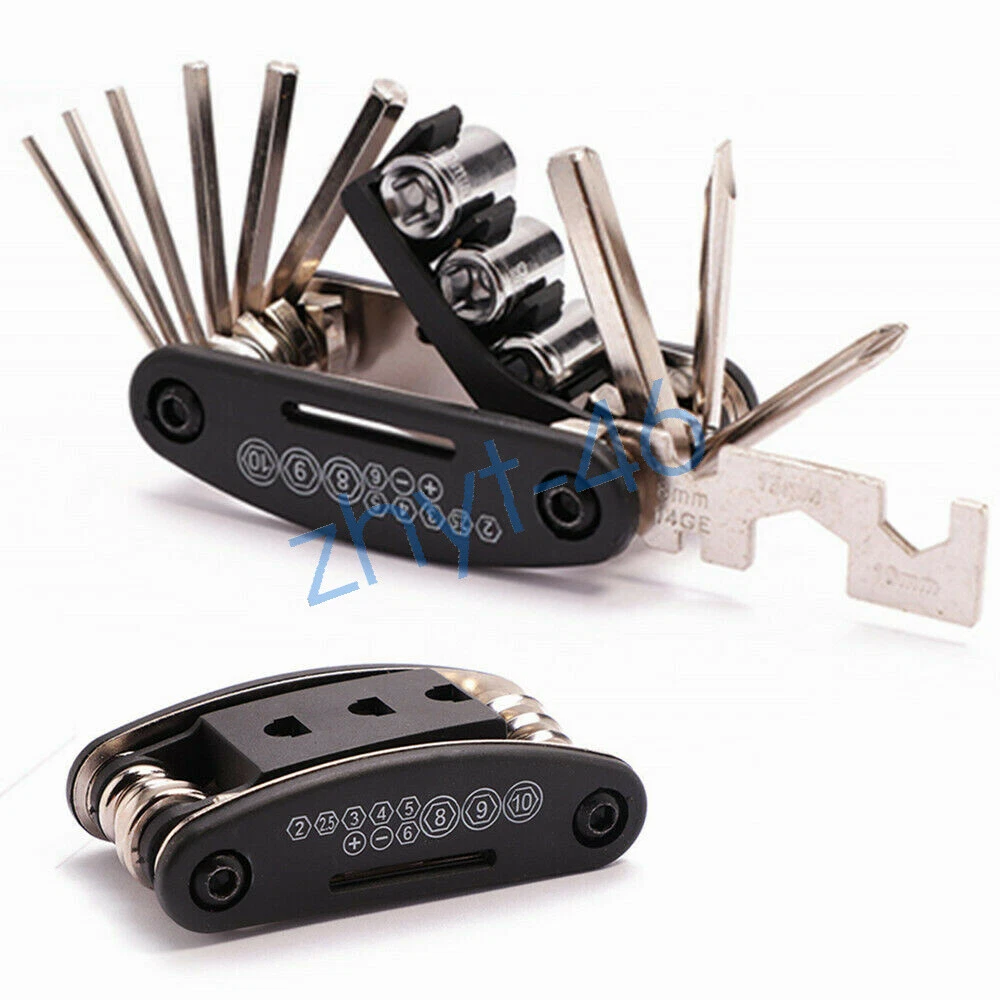
For spark plug access and basic maintenance, a small spark plug spanner/socket kit is priceless:

spark plug access and basic maintenance, a small spark plug spanner/socket kit

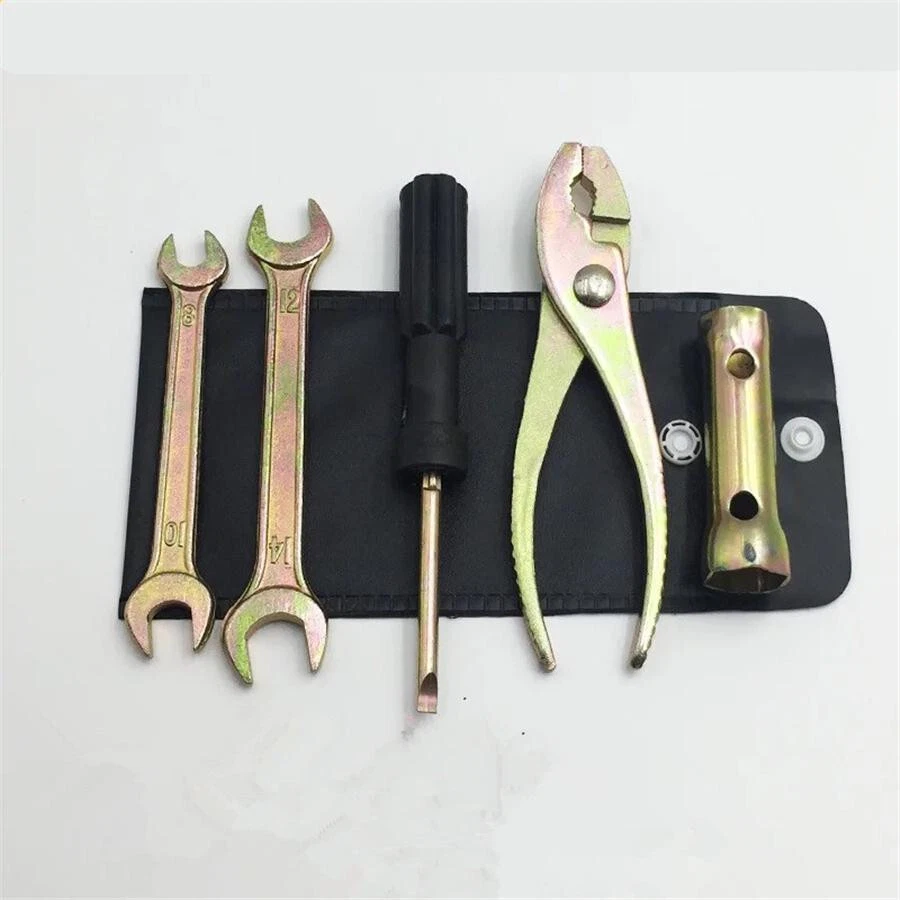
If you only pack one thing, pack a good multi-tool and a small, well-organised kit of fasteners and zip ties. They’re light, cheap, and fix a surprising number of problems.

A Tiny Kit that prevents long delays

From experience, these are the things that stop the most common failures on routes of 200+ km per day:

  • Puncture kit + plugs (for tubeless tyres) and a small inflator (rechargeable),  fix and re-inflate on the road. (See the rechargeable pump above.)
  • Compact tool kit + Allen set,  tighten loose bolts, adjust linkages, remove and check items. (See the two AliWheels tool kits linked above.)
  • Battery charger/maintainer or portable jump start,  keep electronics alive, and be ready for a weak battery. AliWheels stocks maintainers and electrical accessories for motorcycles.
  • Spare bulbs, fuses, and a small bag of bolts,  often what feels like “bad luck” is a blown bulb or a lost bolt. A few spares and zip ties save the day.
  • Tyre pressure gauge,  vital for spotting slow leaks and measuring post-repair inflation.
  • A small first-aid kit and flashlight,  safety beyond the bike itself.

These products are the hidden treasure, as they save time, money, and stress. Compared with being stranded, they are a tiny investment.

How to Pack and Use Your Kit Effectively?

A few habits make the kit useful: keep everything in labelled pouches; practice using your puncture kit at home so you’re not learning under pressure; and do a quick electrical check each night if you’re using lots of accessories. Also, replace perishable items (CO₂ cartridges, plugs, or consumables) after use.

When buying, ensure that the thread types and socket sizes in your toolkit match those of your bike. AliWheels’ product pages display sizes and fitment information, allowing you to match before making a purchase.

Leaving Well-Prepared is Ultimate Freedom

If you love long rides, the goal is to turn unknowns into manageable tasks. A puncture kit, a compact toolset, and a charger are the classic triumvirate that stop most route-ending problems. Pair those with simple checks (tyre condition, battery health, bolt security), and you’ll spend more time riding and less time waiting.

Want direct suggestions for a kit based on your bike type (tourer vs. lightweight commuter)? Tell me your bike model, and I’ll pull a small, targeted parts list from AliWheels with direct links and an estimated total so you can order everything in one go.

Ride safe, plan smart, and enjoy the road.

(Commenting: OFF)

Motorcycle maintenance isn’t just about oil changes, tire pressure, or chain tension. Electrical systems, often overlooked, play a critical role in ensuring your bike starts reliably, runs smoothly, and keeps you safe on the road. From your battery and wiring to lights and ignition systems, skipping preventive motorcycle electrical maintenance can lead to unexpected breakdowns, expensive repairs, and even safety hazards.

Many riders only notice electrical issues when the bike refuses to start or lights flicker mid-ride. By then, the problem has often been building for weeks or months. Preventive motorcycle electrical maintenance doesn’t take long, but it can save you significant headaches and keep your bike performing at its best.

How Important is Motorcycle Electrical Maintenance?

Motorcycles have a surprisingly complex electrical system. Even a small issue like a corroded connector or loose wire can create chain reactions:

  • Battery failure: Preventable neglect is the most common cause of no-start situations.
  • Lighting issues: Dim or flickering lights can reduce visibility and safety.
  • Ignition and charging problems: Poor connections can affect spark, throttle response, or charging efficiency.
  • Accessory malfunctions: GPS, heated grips, or aftermarket electronics can fail if the system is stressed.

A proactive approach ensures reliability, longer component life, and peace of mind while riding.

Motorcycle Electrical Components Most Riders Forget

Some parts of your bike’s electrical system are easy to overlook:

1. Battery Connections

Loose or corroded terminals are a silent killer. Even a fully charged battery may fail to deliver power if connections are poor.

  • Check for corrosion, especially on exposed metal posts.
  • Tighten terminals securely, but avoid over-tightening.
  • Use dielectric grease on terminals to prevent future corrosion.

2. Fuses and Relays

Fuses protect your bike’s circuits from shorting or overcurrent. Relays control power flow to major components. Most riders check these only when something stops working.

  • Inspect fuses regularly for discoloration or damage.
  • Make sure relays click and function as intended.
  • Keep spare fuses on hand for emergencies.

3. Wiring Harness and Connectors

Vibrations, heat, and moisture can degrade wiring over time. Loose or frayed wires cause intermittent electrical failures.

  • Visually inspect visible wires for chafing or cracks.
  • Make sure connectors are fully seated and clean.
  • Use electrical tape or heat-shrink tubing to protect exposed wires.

4. Charging System

Your bike’s alternator, stator, and regulator/rectifier keep the battery charged while riding. Many riders only notice a problem when the battery dies mid-ride.

  • Check battery voltage with a multimeter. A healthy battery should read around 12.6V (engine off) and 13.5–14.5V when running.
  • If voltage readings are low, have your charging system inspected.
  • Clean all connections between the battery, alternator, and regulator.

5. Switches and Controls

Handlebar switches, ignition keys, and starter buttons are used every ride, but rarely cleaned or lubricated. Dirt, moisture, or corrosion can cause intermittent failures.

  • Use contact cleaner for switches if you notice stiffness or sticking.
  • Inspect brake and clutch switches for proper engagement.
  • Test turn signals, horn, and high/low beam functions regularly.

6. Lights and Indicators

Headlights, tail lights, brake lights, and turn indicators are vital for safety. Many riders ignore them until a bulb burns out.

  • Inspect bulbs for brightness and proper operation.
  • Clean lens covers to improve light output.
  • Replace aging bulbs proactively to prevent sudden failure.

Simple Preventive Maintenance Steps

  1. Monthly Inspection: Check battery voltage, connections, fuses, lights, and switches.
  2. Cleaning Terminals and Connectors: Use a soft brush, contact cleaner, or dielectric grease to prevent corrosion.
  3. Check for Frayed or Exposed Wires: Repair minor damage immediately.
  4. Test Charging System: Use a multimeter during routine maintenance to ensure the battery charges correctly.
  5. Lubricate Moving Switches: Keep starter and clutch/brake switches smooth.
  6. Check Lights Before Every Ride: A glance ensures everything functions and improves safety.

Even spending 15–20 minutes a month on these checks can prevent unexpected breakdowns and costly repairs.

Tips from Experienced Riders

  • Keep a small electrical maintenance kit in your garage: multimeter, contact cleaner, dielectric grease, spare fuses, and electrical tape.
  • Document maintenance dates and findings. Over time, patterns emerge, allowing you to spot recurring weak points.
  • Don’t ignore aftermarket accessories; they can strain the electrical system if not installed properly.
  • For long-term storage, disconnect the battery or use a trickle charger to maintain charge and prevent sulfation.

Preventive motorcycle electrical maintenance is one of the easiest ways to ensure reliability, performance, and safety. Most riders forget simple checks like battery terminals, fuses, connectors, switches, and lights until it’s too late. Spending a small amount of time each month inspecting and cleaning these components saves headaches, keeps your bike running smoothly, and prevents roadside surprises.

Motorcycles are mechanical and electrical systems in one package. Treating the electrical side with the same diligence as engine or suspension maintenance ensures every ride is trouble-free and enjoyable. A few minutes of preventive care can make the difference between a smooth trip and an unexpected breakdown.

(Commenting: OFF)

If you ride regularly, you know how quickly dust, pollen, and grit can clog your bike’s air filter. It’s one of those maintenance jobs most riders postpone until performance noticeably drops, throttle response becomes sluggish, fuel efficiency dips, or your engine just feels tired. The good news? You don’t always need to remove the air filter completely to give it a proper cleaning. With the right approach, a few tools, and some patience, you can clean your air filter in place and keep your engine happy without taking half your bike apart.

A Clean Motorcycle Air Filter Keeps You Running

An air filter might seem like a minor component, but it plays a critical role in keeping your engine healthy. It keeps dust, dirt, and other airborne particles from entering the engine, where they can cause wear, corrosion, and reduced performance. When the filter gets clogged:

  • Your engine struggles for air, reducing power and throttle response
  • Fuel efficiency drops because the engine compensates for restricted airflow
  • Idle becomes rough or inconsistent
  • Long-term wear increases, potentially shortening engine life

Regular partial cleaning extends your filter’s life, keeps performance smooth, and prevents expensive repairs down the road.

Spot the Trouble Before It Hits

You don’t need fancy tools to know your filter is dirty. Sometimes, a simple visual check or paying attention to your bike’s performance is enough. Common signs your air filter needs cleaning include:

  • Visible dirt or dust through the intake vents
  • The engine feels sluggish or less responsive
  • Fuel mileage drops unexpectedly
  • Black smoke or unusual exhaust odor
  • Riding in dusty, sandy, or urban environments frequently

If any of these signs are present, it’s a good idea to clean your filter immediately rather than waiting for the scheduled maintenance.

Tools You’ll Need

You don’t need a full mechanic’s toolkit. Most of the time, a few simple items will do:

  • A soft brush (an old paintbrush or detailing brush works perfectly)
  • Compressed air or a gentle air blower
  • Microfiber cloth for cleaning the housing
  • Mild soap solution (optional, for foam filters)
  • Gloves (optional, to keep your hands clean)

Even if you’re working in your garage or driveway, these tools are enough for a thorough cleaning.

Step-by-Step Cleaning Without Full Removal

Cleaning the filter without removing it fully is straightforward if you follow these steps carefully.

1. Open the Cover Just Enough

You don’t need to pull out the filter completely. Most motorcycles and cars are designed so you can loosen the housing or cover and access the exposed part of the filter. This way, you reduce the risk of damage or misalignment.

2. Brush Off Loose Dirt

Using a soft brush, gently sweep away surface dust and debris. Work from top to bottom and avoid pushing dirt further into the filter. Be thorough but gentle; the fibers are delicate.

3. Blow Out Hidden Dust

Use compressed air or a small air blower to remove stubborn particles. Always blow from the clean side outward. This prevents debris from being pushed deeper into the filter, which could reduce airflow. Keep the pressure moderate to avoid damaging the material.

4. Handle Foam or Oiled Filters Carefully

If your filter is foam or oiled cotton:

  • Foam filters: Lightly rinse with a mild soap solution. Squeeze gently to remove dirt (never wring it). Let it air dry completely before reassembling.
  • Oiled filters: Use a filter cleaning spray designed for oiled filters. Avoid over-saturating the filter,  just enough to remove grime.

5. Clean the Housing

Wipe down the inside of the air filter housing with a microfiber cloth. Dust or debris inside the housing can fall back onto the filter, undoing your cleaning efforts.

6. Secure the Cover

Reattach the housing or cover, making sure all screws, clips, or fasteners are properly tightened. A loose cover can allow unfiltered air into the engine, defeating your work entirely.

Tips That Only Experienced Riders Know

  • Check more often in dusty environments: If you ride in sandy or construction-heavy areas, a partial cleaning every 500–800 km is recommended.
  • Don’t overdo it: Brushing and blowing air are usually sufficient. Excessive handling or washing can damage the filter.
  • Maintain a cleaning log: Record the date, mileage, and method. Over time, you’ll know exactly when the filter needs attention.
  • Be gentle with the foam/oiled filters: Over-saturating with soap or oil can reduce airflow and engine efficiency.
  • Combine with other maintenance: Every few months, check spark plugs, oil, and chain tension. Your filter check can be part of a broader maintenance routine.

When to Remove the Filter Fully?

Partial cleaning is great, but it has limits. Full removal and deep cleaning or replacement is required if:

  • The filter is extremely dirty, oily, or caked with grime
  • You notice a persistent reduction in engine power
  • Foam filters are hardened or deteriorating
  • Paper filters are clogged beyond brushing or blowing air

In these cases, it’s better to invest the time to remove, clean, and if necessary, replace the filter; it’s cheaper than paying for engine repairs later.

Tip from Mechanics

Many professional riders and garage mechanics do partial cleaning as a quick maintenance hack before long trips. It’s especially useful when you’re on the road, traveling, or don’t have the tools or time to remove the filter completely. Regular partial cleaning keeps the airflow smooth, prolongs filter life, and avoids engine strain. It’s a small task that pays off big.

Conclusion

Cleaning your motorcycle air filter without fully removing it is a smart, time-saving maintenance hack for riders. With minimal tools and a careful approach, you can maintain airflow, engine performance, and fuel efficiency, all without a major disassembly. Combine this with regular checks, occasional full cleaning, and general maintenance, and your engine will run smoother, longer, and more reliably. By making partial air filter cleaning a part of your routine, you’re protecting your investment and keeping your rides enjoyable, efficient, and stress-free.

(Commenting: OFF)

Most riders don’t realize this, but 80% of motorcycle breakdowns come from skipping the simplest motorcycle maintenance tasks. Not blown engines. Not snapped chains. Just the small things, a clogged air filter, an old spark plug, or oil that should have been changed months ago.

If you’ve ever wondered Why does my bike feel weak?” or Why is my fuel average dropping?” the answer often hides in your basic maintenance routine.

This guide breaks down a complete, practical DIY motorcycle maintenance checklist that keeps your motorcycle running smoother, cooler, and stronger,  the same level of detail a dealership mechanic would follow,  but without the service charges. And whenever you need genuine motorcycle parts, AliWheels stands as Pakistan’s trusted source for authentic, high-quality components worn by real riders.

Why DIY Motorcycle Maintenance Matters More Than You Think?

There’s a very obvious pattern among pro riders:
The ones who get the most life out of their engine aren’t the fastest riders; they’re the most disciplined. They know exactly when their air filter is due, when their oil starts thinning, and when the spark plug begins losing its bite.

DIY motorcycle maintenance gives you:

  • A bike that starts instantly,  even on cold mornings
  • Faster throttle response
  • Lower engine temperature in traffic
  • Better fuel average
  • Longer engine life (sometimes double)

You’re not just maintaining a machine; you’re extending the life of a partner that takes you through every season and every street.

1. Filters: They Act as the Lungs of Your Motorcycle

Your bike breathes through its filters. When they get dirty, everything else suffers.

Air Filter

A clogged air filter makes the engine run rich, lose power, burn more fuel, and heat up faster. If your bike feels lazy or your exhaust note sounds “choked,” this is usually the culprit.

Clean or replace every 1,500–2,000 km, or more frequently if you ride dusty routes.

Air Filters Collection at Aliwheels:

Oil Filter

Modern bikes rely heavily on clean oil flow. A clogged oil filter starves the engine and accelerates wear.

Replace with every oil change. Check out the Oil Filters Collection at Aliwheels:

2. Spark Plug: The Heartbeat of Your Engine

A weak spark plug can cause:

  • Morning starting trouble
  • Low pickup
  • Rough idling
  • Misfires
  • Poor mileage

Most riders don’t notice the decline because it happens slowly,  over months.

For most motorcycles, inspect or replace spark plugs every 5,000–7,000 km.

Genuine Spark Plugs on AliWheels

3. Engine Oil: Your Bike’s Lifeline

Oil does more than just lubrication; it cools the engine, protects metal surfaces, and keeps performance stable. Old oil loses viscosity and turns acidic, which directly harms piston rings and clutch plates.

Change oil every:

  • 1,500–2,000 km for commuter bikes
  • 2,500–3,000 km for synthetic oils
  • 1,200 km if riding in very hot climates or heavy traffic

If your bike vibrates more than usual, or gears feel harder,  it’s usually the oil asking for retirement.

4. Essential Fluids Most Riders Forget

While oil gets attention, other fluids quietly decide your bike’s health.

Brake Fluid

Old brake fluid absorbs moisture → causes brake fade, and a spongy lever feel.

Replace every 12 months.

Coolant

If your bike overheats in traffic, weak coolant is often the reason. It degrades faster in summer and stop-and-go conditions.

Replace every 10,000 km or annually.

Chain Lubricant

A dry chain steals power, increases vibration, and wears sprockets prematurely.

Lubricate every 300–500 km and after every wash.

5. Battery & Electrical Inspection

If your bike struggles to start in the morning, especially in winter, the battery or plug may be weakening.

Check:

  • Terminals for corrosion
  • Wiring for cuts
  • Headlight brightness
  • Horn strength

Low output = weak battery.

6. Tires & Brakes, Safety You Can’t Neglect

Your tyres tell stories: how you ride, where you ride, and what needs fixing.

Uneven wear means suspension or tire pressure issues.
Shaking during braking = warped discs or worn brake pads.
Low grip = expired rubber.

Brake Pads collection at Aliwheels

7. The Real Pro-Level DIY Routine (Follow This Sequence)

If you want your bike to feel brand new again, this is the exact order professionals follow:

  1. Replace engine oil
  2. Change/clean the air filter.
  3. Replace the oil filter.
  4. Inspect the spark plug.
  5. Adjust the chain + lubricate
  6. Check coolant
  7. Check brake fluid
  8. Inspect tires and pressures.
  9. Clean battery terminals
  10. Lubricate all moving joints (clutch, brake levers, foot pegs)

Do this every 4–8 weeks based on usage.

Your bike will feel tighter, smoother, quicker, and significantly cooler on hot days.

Maintain Smart, Ride Relaxed

Every motorcycle,  whether a daily commuter or a long-distance tourer,  has one thing in common: it rewards the rider who cares. You don’t need a mechanic for every little thing. You just need the right checklist and genuine parts that protect your engine instead of harming it.

That’s where AliWheels stands tall. Authentic parts. Verified sellers. Zero fakes. Everything your bike needs,  delivered at your doorstep.

Replacing a spark plug or preparing for a cross-country ride, maintaining your motorcycle like a pro begins with the right parts.

(Commenting: OFF)

Or login with your social account