5 Motorcycle tasks you can do yourself to save your money, keep you safe, and give you a sense of accomplishment. Paul Olesen, a Wisconsinite who owns DIY Moto Fix, says, “I prefer knowing that I’m the guardian of my machines.” “Every time I ride the bike, I have the feeling that everything is in perfect order.” Here are Olesen’s top recommendations for mastering motorcycle maintenance on your own.
In practice, depending on your bike, the needs for each of these chores may differ. Before you start learning about things like the placement of filters and plugs, as well as the pieces you’ll need to remove to get to them; the proper volumes and types of various fluids, as well as the intervals for changing them, consult your owner’s handbook. and torque requirements for changing them; and torque specifications for reinstalling nuts and bolts to the proper tightness. For bikes that lack a center stand, use a rear stand device to position them upright.
1. Change The Oil
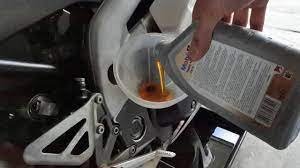
You’ll need to change the oil after a few thousand miles to keep your engine operating smoothly; consult your owner’s handbook for further information. To begin, ride the bike for about five minutes just to get it warmed up. “This reduces the viscosity of the oil, making it easier to drain,” adds Olesen. Remove the drain and oil fill plugs with the engine off and the bike standing upright, allowing the oil to flow into a drain pan. (To access the drain plug, you may need to remove some fairing.) Remove the oil filter as well. (Warning: This is a messy process! To prevent drippage, wrap the engine and/or exhaust section with aluminum foil.) Install a new oil filter, replace any parts you removed, and refill with the right amount and kind of motorcycle oil, as specified in the owner’s manual, using a funnel and the proper amount and type of motorcycle oil. Remove the oil fill cover and replace it. Use a bike shop or a municipal facility to recycle the spent oil.

2. Get a New Air Filter
Your motorcycle’s performance will suffer if the air filter—which keeps debris out of the engine—is blocked and unclean. “Changing an air filter isn’t necessarily a difficult process,” adds Olesen, “but it can be time-consuming.” The air filter is sometimes easy to reach, but you may need to remove the gas tank and other components to get to it. Remove and replace the air filter once you’ve gotten into the air box. Then reinstall whatever you took out.

3. Keep Tire Pressure and Tread Consistent
Locate the valve stem on the inside of the wheel, remove the cap, and place an air pressure gauge against the valve stem to check the pressure. Compare the pressure to the recommended value, which will be printed on the tire’s sidewall. Fill the tire with the necessary number of pounds per square inch using an air compressor (available at many gas stations) (PSI). If you over-inflate, let out some air. When you’re finished, replace the valve stem cap. Check the tire’s wear indicator—a small rubber knob that sits in the grooves of the tire—to evaluate how well your tread is holding up. If the knob is at the same level as the rubber, that meets the road, it’s time for a tire replacement—a job for a professional mechanic.

4. Replace the cooling fluid
Remove any necessary bodywork to gain access to the coolant drain bolt, then install a drain pan under the engine and remove the bolt when it’s time to change the coolant, which keeps your engine from overheating, freezing, or corroding. Remove the radiator cap to ensure that everything drains properly. Reinstall the drain bolt once the process is finished. Fill the system with the correct amount of coolant using a funnel. Reinstall the radiator cap and any bodywork that has been removed. Before cutting the ignition, start the engine and let it warm up for a few minutes. Remove the radiator cap and check the coolant level when the engine has cooled.

5. Maintain A Clean Chain
According to Olesen, most chains these days are O-ring chains, which require less cleaning than old-style unsealed chains. When the chain becomes extremely dusty, or when the mileage in your owner’s manual suggests, clean it. When you’re done, raise your bike’s back wheel and shift into neutral to allow for simple chain movement. To remove grit and filth from the chain, use a soft bristle brush. Rotate the back wheel while applying specially designed chain lube to lubricate the chain.


